Some say it’s about the journey, not the destination, but at First Rank SEO, we say it’s about both. Let us elaborate.
In the eternally changing SEO landscape, higher search engine rankings are what everyone’s after—the destination, so to speak. But the path to get there isn’t always straight or straightforward. It evolves over time and includes a vast range of different elements and factors that must be strategically navigated—the SEO journey—if you will.
Our guiding star is always the higher rankings at the journey’s end, but in order to get there, we need to track our progress, make adjustments along the way, and communicate each twist and turn to our clients with transparency and precision. How do we do this? By gathering, analyzing, and interpreting high-quality data, insights, and metrics.
At First Rank, Google Analytics is one of the many tools we use to carry out thorough and effective organic action tracking for our clients. We regularly set up and manage GA4 accounts, and in this post, we’ve offered step-by-step instructions to help get you started as well. In addition, we’ve also provided an overview of how GA4 fits into the broader geography of our agency’s tracking and reporting software.
There’s a lot to cover, so let’s get started!
What Is Google Analytics 4 and Why Does It Matter?
Google Analytics 4 (GA4) is the latest version of Google Analytics, a free web platform that uses a combination of statistics and analytical tools to track traffic and engagement across your various websites and mobile apps. Google Analytics 1 was first released in 2001, followed by GA2 in 2011, and GA3 (also known as Universal Analytics) in 2012. In 2020, Google released Google Analytics 4.
Whereas Universal Analytics (UA) was based around tracking specific user interactions (“hits”) within a visit to your website (known as a “session”), Google Analytics 4 works on an event/parameter model that allows for much greater flexibility and customization. This new-generation tracking model is timely and hugely beneficial overall (not least because of its multi-platform capabilities), but it can also come with a steep learning curve, especially for those who were accustomed to UA, which Google completely phased out on July 1, 2023.
Google Analytics 4 matters immensely because it can help you gain comprehensive insights into your website’s performance without paying a penny. Its range of capabilities and customization options are impressive, to say the least, and if you’re not yet taking advantage of this formidable platform, it’s time to dive in and learn how to harness its power to your advantage.
Setting Up GA4: An Overview
For streamlined instructions on how to get started with GA4, you can access Google’s help page for setting up analytics for a website and/or app. That being said, many users prefer more detailed information on the process.
Follow the clearly laid out steps below to get started with GA4 so that you can begin creating custom events to effectively track and zero in on your business’s specific targets and goals. (Alternatively, you can leave all that heavy lifting to our experienced and professional team at First Rank. Our proven track record speaks for itself.)
Create Your GA4 Property
Before you can start exploring Google Analytics 4, you’ll have to establish a GA4 property. If you’ve never registered with Google Analytics before, you’ll need to visit the Google Analytics welcome page and click Start Measuring to create an account (you’ll be guided through a series of steps).
If you already have a Google Analytics account, you’ll need to click Admin at the bottom left of your GA homepage:

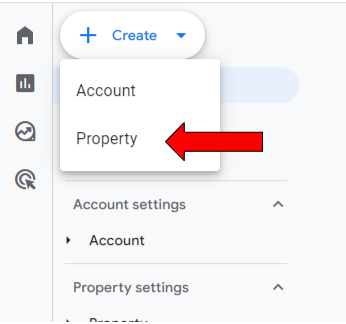
Then, you’ll click the Create menu at the top left of the page and select Property:
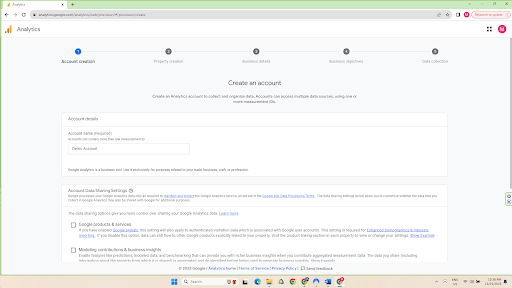
After this, you’ll be guided through a series of steps that will allow you to set up the parameters for your GA4 property. Bear in mind that a single GA4 account can include multiple properties (websites, mobile apps, devices).
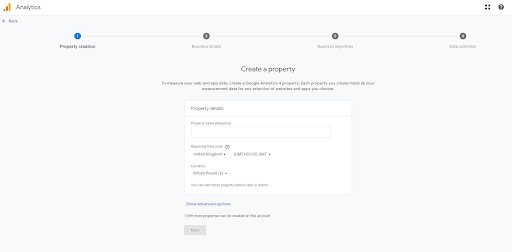
When setting up a new property, you must enter details about it, such as its name, country, time zone, and currency. You’ll also be prompted to fill in information about your business objectives and general data collection preferences. Click Create, and you’ll have completed the initial step in your GA4 journey.
Add a Web Data Stream
At First Rank, our primary focus is SEO (search engine optimization), which means that the GA4 properties we work with are mainly websites. In this post, therefore, setting up GA4 data streams for websites will be our focus.
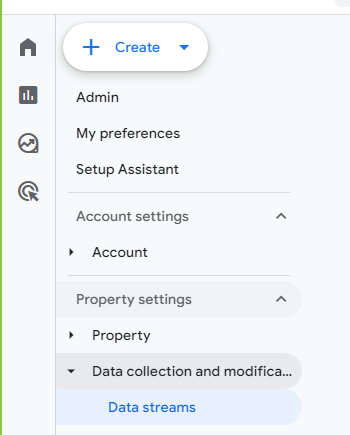
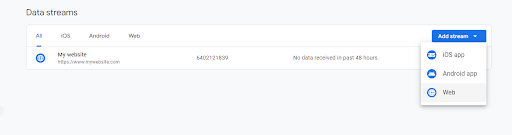
To add a website data stream to GA4, click on Data Streams under the Data Collection and Modification menu at the left hand side of your Admin page:
Next, click the blue Add Stream button in the top right-hand corner of the page and select Web:
From there, you’ll enter your website’s URL and provide a stream name. Also, on this page, you’ll notice that Enhanced Measurement will already be enabled:
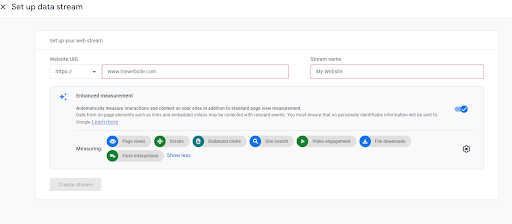
Enhanced Measurement is designed to help GA4 users automatically track pre-set events that Google believes will be broadly relevant for most websites. These include:
- Page views
- Scrolls
- Outbound clicks
- Site search
- Video engagement
- File downloads
- Form interactions
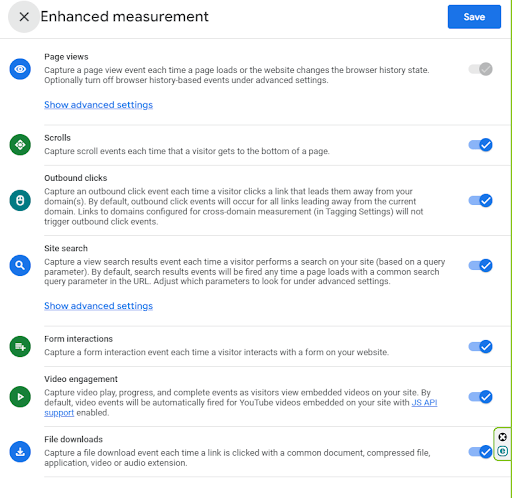
If you wish to disable Enhanced Measurement entirely, you can do so with a single click. If you want to configure your Enhanced Measurement settings, click the gear symbol in the bottom right-hand corner of the window to enable or disable specific measurements:
Install Google Analytics 4
Once you’ve added a data stream, the third step in setting up GA4 is installing it. There are three ways to install Google Analytics 4 on your website:
- With Google Tag Manager
- This method is recommended for users who have already installed Google Tag Manager (GTM) on their website and are familiar with its functions. To install GA4 using GTM, you must access your GA4 measurement ID (see below).
- With a plugin
- This method is recommended for users who are using any number of popular content management systems that support GA4 (e.g. WordPress, Shopify, etc.). Each platform’s GA4 plugin will operate differently, so you may need to do a little research. Overall, using a plugin to install GA4 should be a straightforward process.
- With the native tracking code
- At First Rank, this is our preferred method for installing GA4. It’s simple, straightforward, and keeps the installation process entirely within your control (see below).
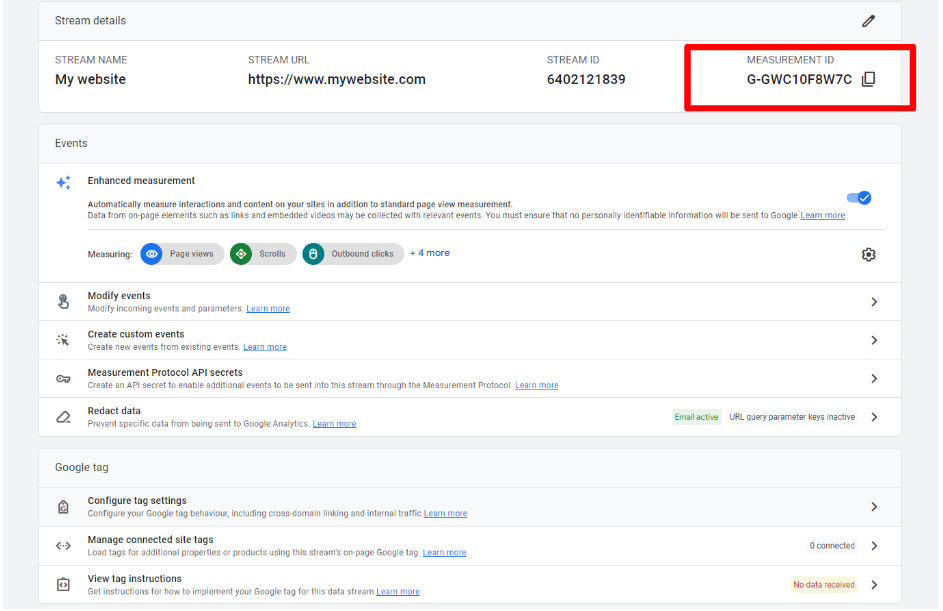
As soon as you’ve completed the Google Analytics 4 property creation process, you’ll receive a measurement ID and tag settings. The former is a unique ID in the format G-XXXXXXX that can be used to identify your data streams. To access it, go to Data Streams (see above) and then click on your website to access your Measurement ID:

If you plan to install GA4 using Google Tag Manager (GTM), you’ll need to copy and paste your Measurement ID into the Tag ID field when prompted.
Your GA4 tag settings can be found by accessing your Measurement ID (see above) and selecting Configure Tag Settings in the menu below it:
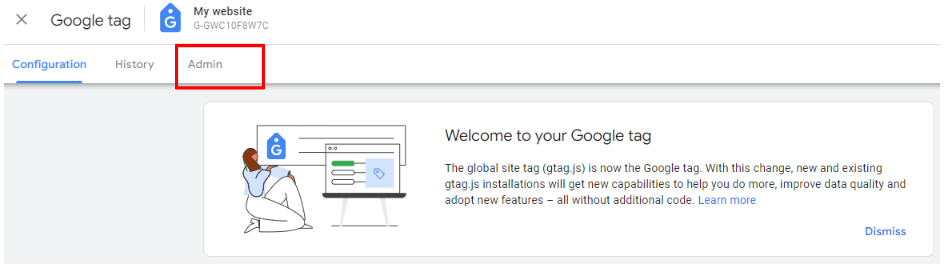
Next, you’ll select the Admin tab at the top of the Google Tag page:
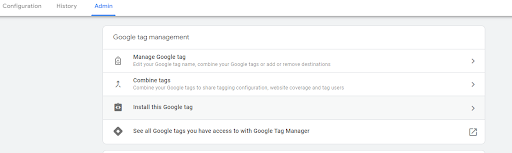
After that, you’ll select Install This Google Tag:
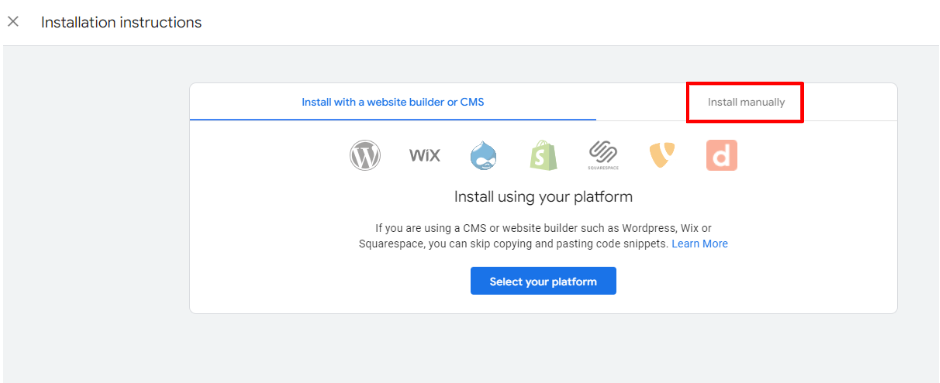
Under Installation Instructions select Install Manually:
Finally, you’ll be able to access the Google Tag for your account (highlighted below):
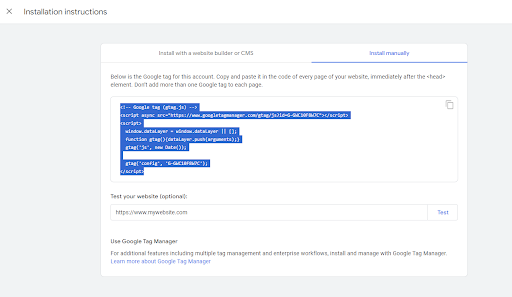
This code needs to be attached to the head section (header) of your website, which will ensure that it loads on every page.
Next Steps
Congratulations, you’ve successfully set up GA4 for your website! But that’s only the very first step in your tracking and insights journey. Now you’ll be able to begin tracking organic events based on the parameters you set up.
How to strategize and implement effective event tracking parameters tailored to the needs of your website and business goals is a topic for a much lengthier post (or an in-person conversation with the First Rank team), but understanding how we, at First Rank, set up and integrate GA4 to maximize its potential for our clients may help you gain a bigger picture perspective on how you might do so as well.
Let’s take a closer look:
How First Rank Uses GA4 for SEO Services
At First Rank, we use GA4 for internal data analysis as well as for portions of the reports we provide to our clients on a regular basis. (We put together our client reports using Google Looker Studio, another free Google platform that specializes in configuring data from a variety of different sources into digestible visuals such as charts, graphs, tables, bubble graphs, maps, and more.)
While these big picture reports typically include customized metrics specific to each client as well as information from various relevant data sources, they also often include a high-level look at essential data trends from GA4, such as:
- Sessions
- New users
- Organic phone calls
- Traffic channels
- News generated from traffic channels
- Keywords driving traffic
GA4 metrics help provide a concise snapshot of each client’s SEO journey at any given point in time. In turn, they allow our team to track each campaign’s progress with accuracy on an ongoing basis and to effectively communicate that progress to clients (as well as to explain the rationale behind any pivots in strategy).
At First Rank, we use Tag Manager to track organic events through the use of triggers (specific actions on a website). When a trigger occurs, Tag Manager sends an event to GA4, which then pumps it into the client report. Without GA4, it would be significantly more challenging to collect data analytics effectively and efficiently and communicate them within our internal team and to our clients.
First Rank’s Top Tips for Setting Up GA4
Beyond simply installing Google Analytics 4, there’s an incredible amount to explore as you discover how best to set up this platform, harness its power, and refine its capabilities to maximize its benefit for your business. In-depth research, as well as hands-on experimenting, will definitely be in order if you’re new to GA4 and want to use it to manage your own tracking parameters and events (alternatively, First Rank can expertly handle all that for you).
Though far from exhaustive, we thought we’d conclude this post by providing some tips to smooth the outset of your journey when setting up GA4. We asked some members of our team to contribute their top recommendations and, in no particular order, here they are:
Use DebugView
DebugView is GA4’s testing environment. It’s designed to help you ensure that actions and data are coming through properly to the platform. In Debug View, GA4 should populate with actions as you engage with your website within the various event parameters you have set up.
To enter Debug View, go to Admin and select DebugView under Data Display:
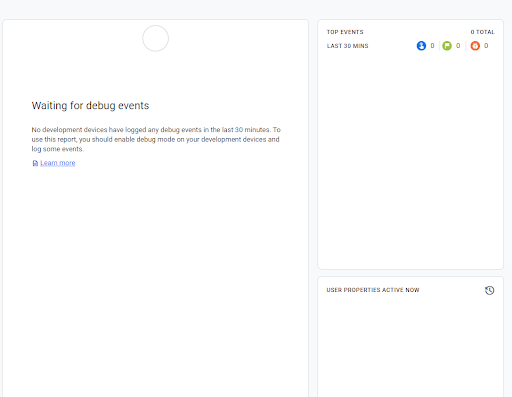
Note that DebugView will only populate with events once it’s been enabled. (In other words, it will be empty, as shown above, when you first access it.)
Filter for Organic Actions
To track organic actions for SEO purposes, filter your data to show organic traffic only. This way, you can accurately track organic engagement with your website via events such as form fills, phone calls, video views, or any other interaction with your site that’s important to you. (If you’re wanting to track paid actions, you can also filter accordingly for Google Ads engagement and more.)
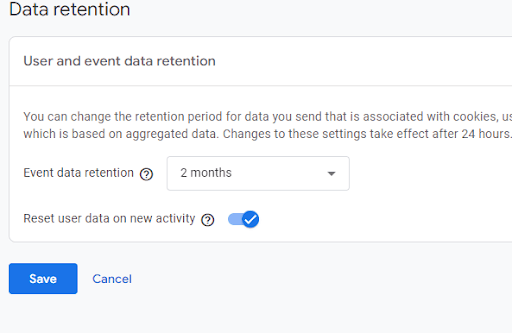
Extend Data Retention Settings
When setting up your GA4 property settings, we recommend extending your data retention settings from the default 2 months to the maximum 14 months available with a free GA4 account. This will enable you to conduct explorations or analyses using GA4 data that goes back as far as possible.
To change your data retention settings, go to Admin and click on Data Retention (under Data Collection and Modification in the middle of the page). Then, simply change the Event Data Retention field from 2 months to 14 months:
Filter for Internal Traffic
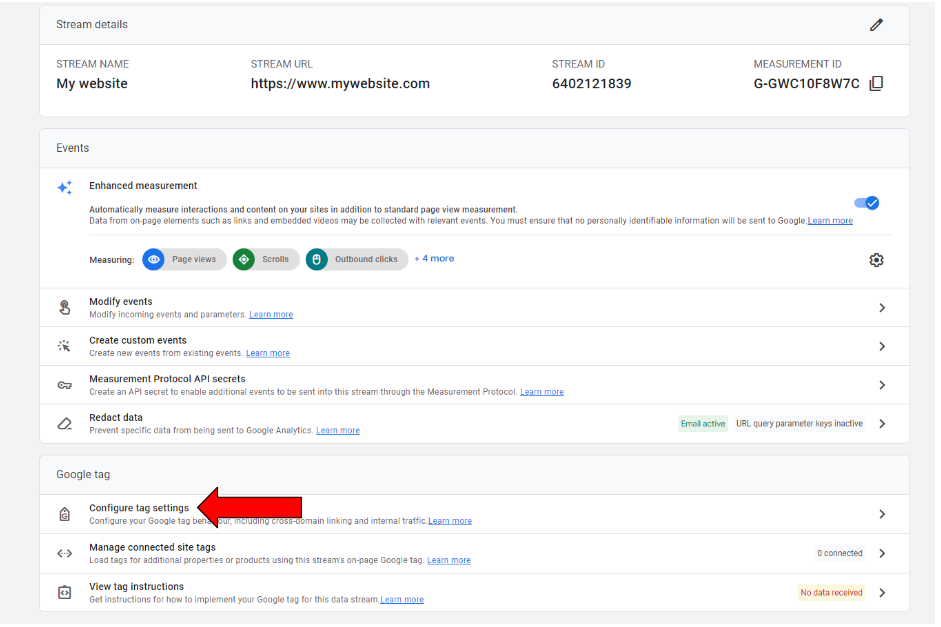
If you don’t filter for internal traffic, you’ll end up tracking the actions not only of organic visitors to your site but also your own and those of your development team. Fortunately, this problem is easily remedied. In Admin, go to Data Streams, click on your website, and then select Configure Tag Settings:
Next, select Define Internal Traffic:
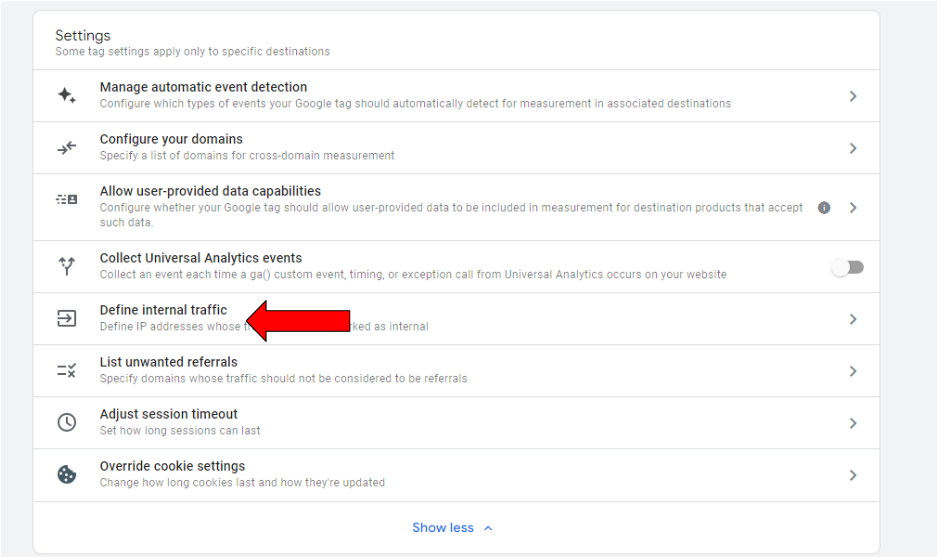
Click the blue Create button and enter the IP address or addresses you wish to filter out:
Conclusion
To conclude, the basic steps in setting up Google Analytics 4 (GA4) involve creating a GA4 property, adding a data stream, and installing GA4 on your website. But that’s truly just the start of your tracking and insights journey with the powerful and highly customizable GA4 platform.
In this post, we’ve provided a brief overview of how to get started with GA4 and how we use the platform at First Rank, and we hope it has whet your appetite to learn more. As we stated at the outset of this post, SEO is about both the journey and the destination, and Google Analytics is one of the core tools that allows us to gain valuable insights every step of the way.
Ready to learn more about the SEO journey and how tools like GA4 and others can help you achieve higher rankings? Contact the experienced and knowledgeable team at First Rank SEO today!
Jacob Kettner is the owner and CEO of First Rank Inc., a digital marketing agency based in Winnipeg, Manitoba. He currently sits on Manitoba Chamber of Commerce Small Business Advisor Council which assists people grow their small businesses in Manitoba.