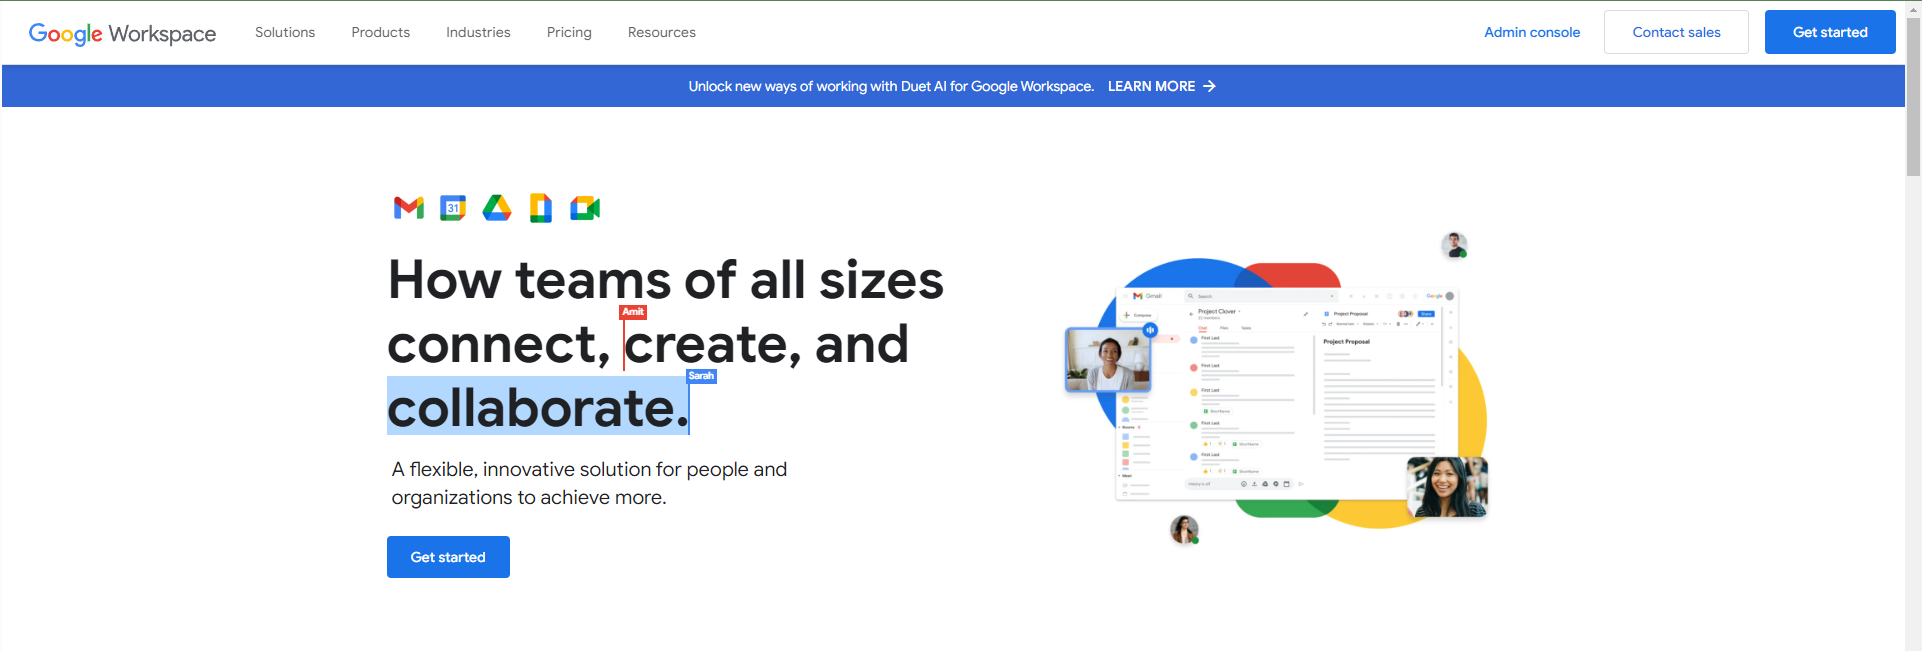
Google Workspace is one of the most popular productivity suites on the planet, offering tools like Google Drive, Google Docs, and Google Calendar. These features are available for free through Google, but many businesses opt for the paid version of Google Workspace—and most of them do it to get a professional email address on Gmail.
A professional email address is, quite simply, an email address that ends with “@yourdomain”. Here at First Rank, our professional email addresses end with @firstrank.ca.
Why Use Google Workspace for Professional Emails?
Website builders like WordPress and hosting platforms like SiteGround will often offer professional email addresses for free using your domain. Despite this, many businesses opt to pay for professional email addresses through Gmail and Google Workspace.
This is because Gmail is, by far, the most popular and one of the most sophisticated email services available. Most (if not all) of your staff members will have experience using Gmail. The service is feature-dense, offering:
- Highly effective spam filters
- A great user interface
- Tons of customizability through custom filters
- Compatibility with third-party email services through POP and IMAP
- No advertising
- Fast service
- Mobile and desktop apps
- 30 GB or more storage per user
- And a whole lot more
Getting a Professional Email: How To Set Up Google Workspace and Gmail
You can set up Google Workspace and your professional email address in four steps:
- Step 1: Set up a Google Workspace account
- Step 2: Verify your domain
- Step 3: Add users to Google Workspace
- Step 4: Set up MX records
Let’s go through the process step by step:
Step 1: Set Up Your Google Workspace Account
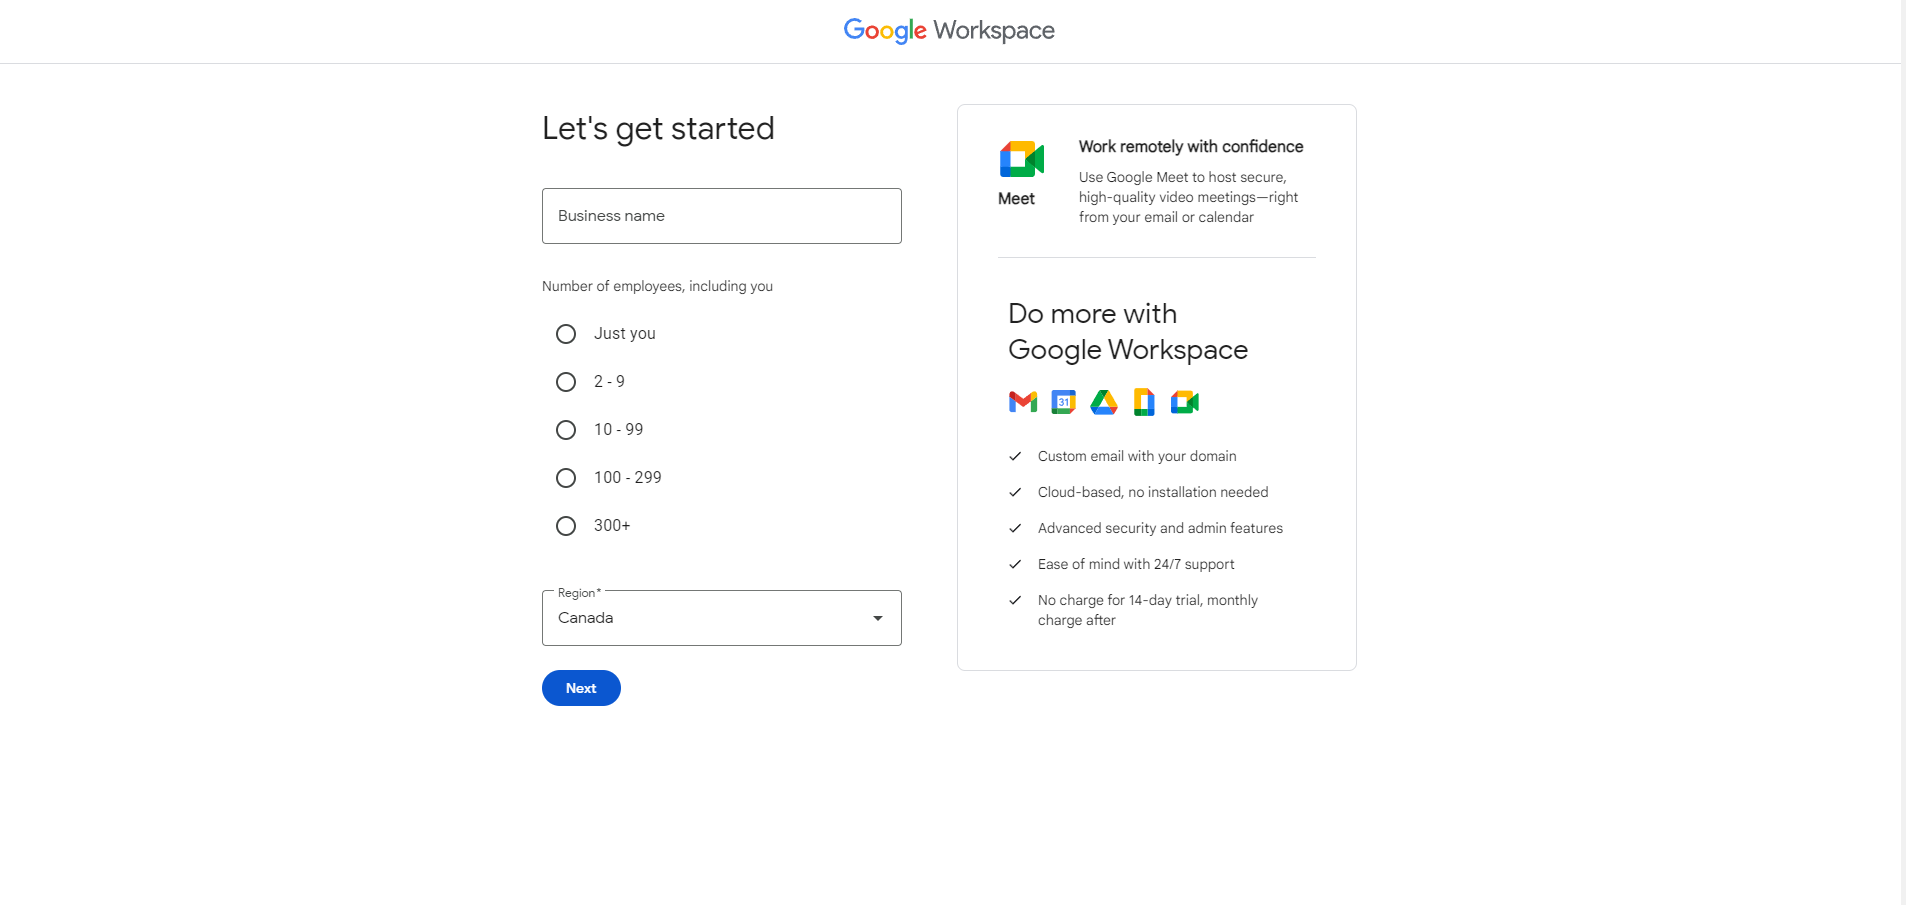
You’ll start by going to the Google Workspace homepage, where you’ll be greeted with the following screen:
Click “Get Started” and you’ll be asked to input information about the name of your business, the number of employees, and your country:
From there, you’ll be asked to provide contact info, including your first and last name:

In the email address category, you have a couple of options. You may already have a professional email address through WordPress or another email service—if that’s the case, feel free to use that email. For those who don’t, you can use your personal email address for the time being.
Click “Next” once the form is complete, and you’ll arrive at this page:
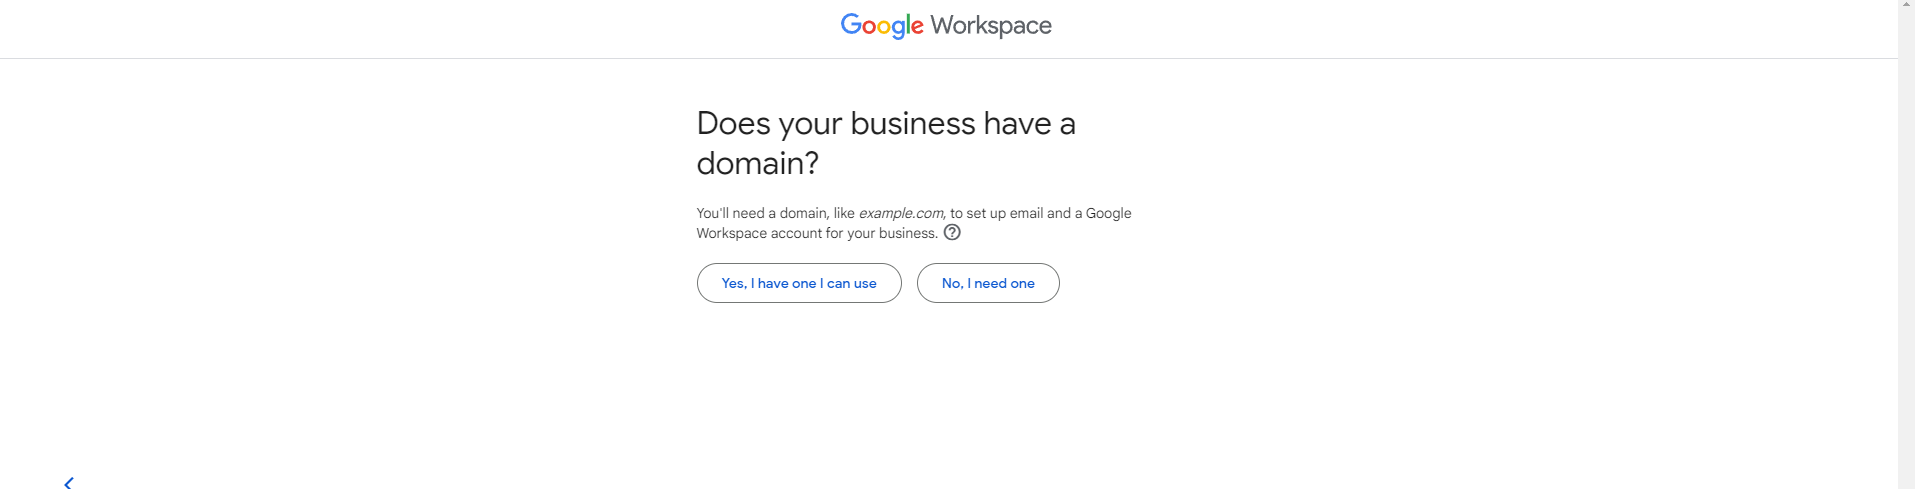
Most of our clients already have domains, so you’ll be able to choose “Yes, I have one I can use”. Alternatively, you can click “No, I need one”—Google will happily sell you a domain.
After clicking “Yes, I have one I can use, you’ll arrive at this page:
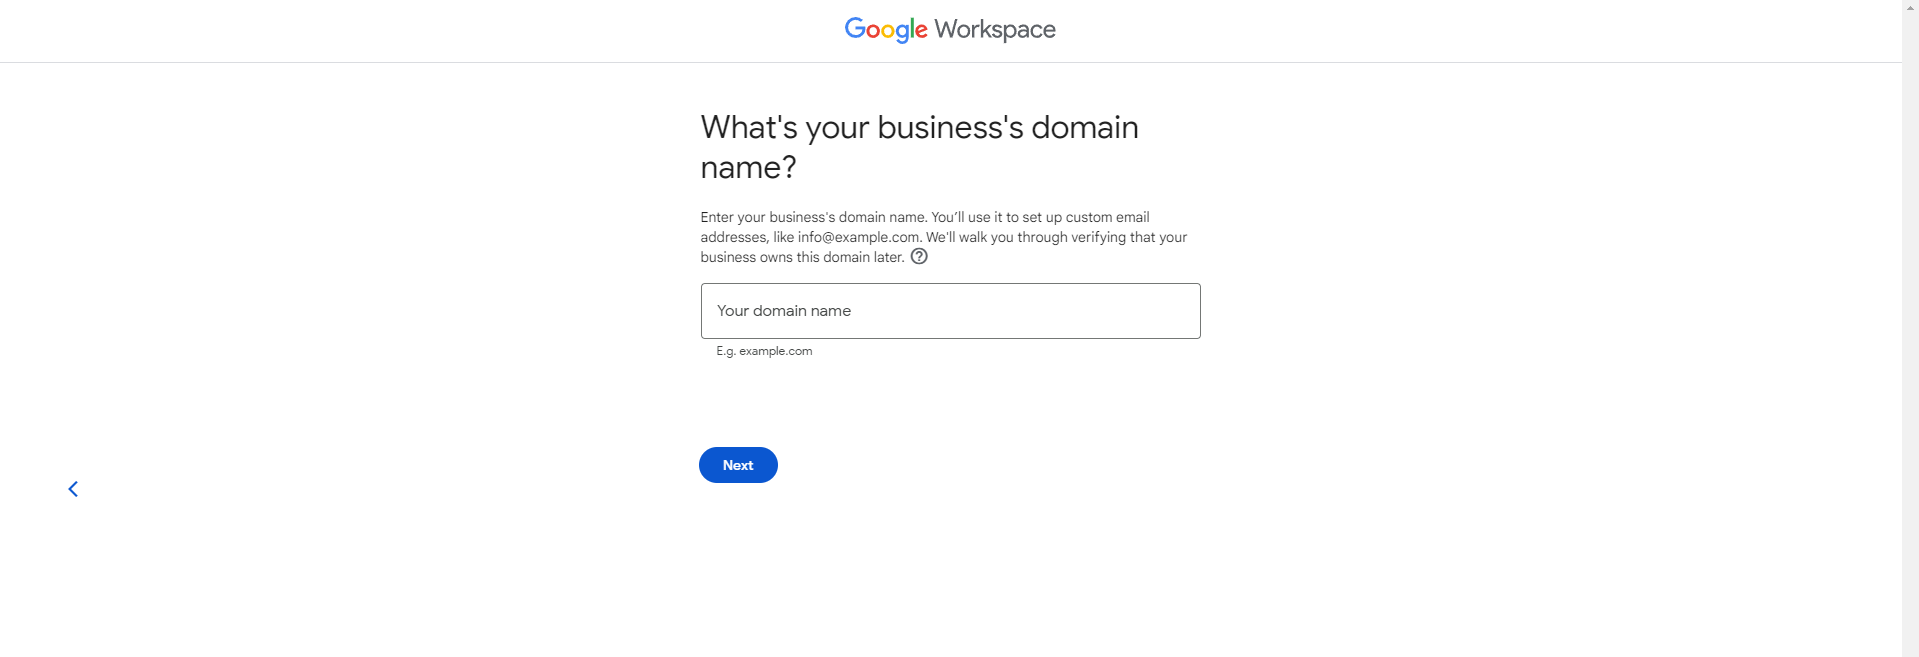
Simply type the domain name of your business (usually the URL for the homepage of your business, like “example.com”) and click “Next”. For our guide, we’ll be using the example domain “petdetective.ca”. Once we hit “Next” we’re met with a confirmation page:

Simply click “Next” again.

On the next page, you can choose whether or not you want marketing emails from Google. They’re useful on occasion; feel free to click “Ok” or “No thanks” depending on your preference.

More of the same in the next section, though we’d almost always opt out of this one—it’s generally a bad idea to sign every user on your workspace up for marketing emails.
![]()
In this step, you’ll create a username and password. Your username will be the name associated with your new Gmail address, so opt for something professional or on-brand. You don’t need to worry about creating an “info@example.com” style email address here—these can be set up later at no extra cost.
Complete the CAPTCHA, fill out the username and password forms, then click agree and continue!
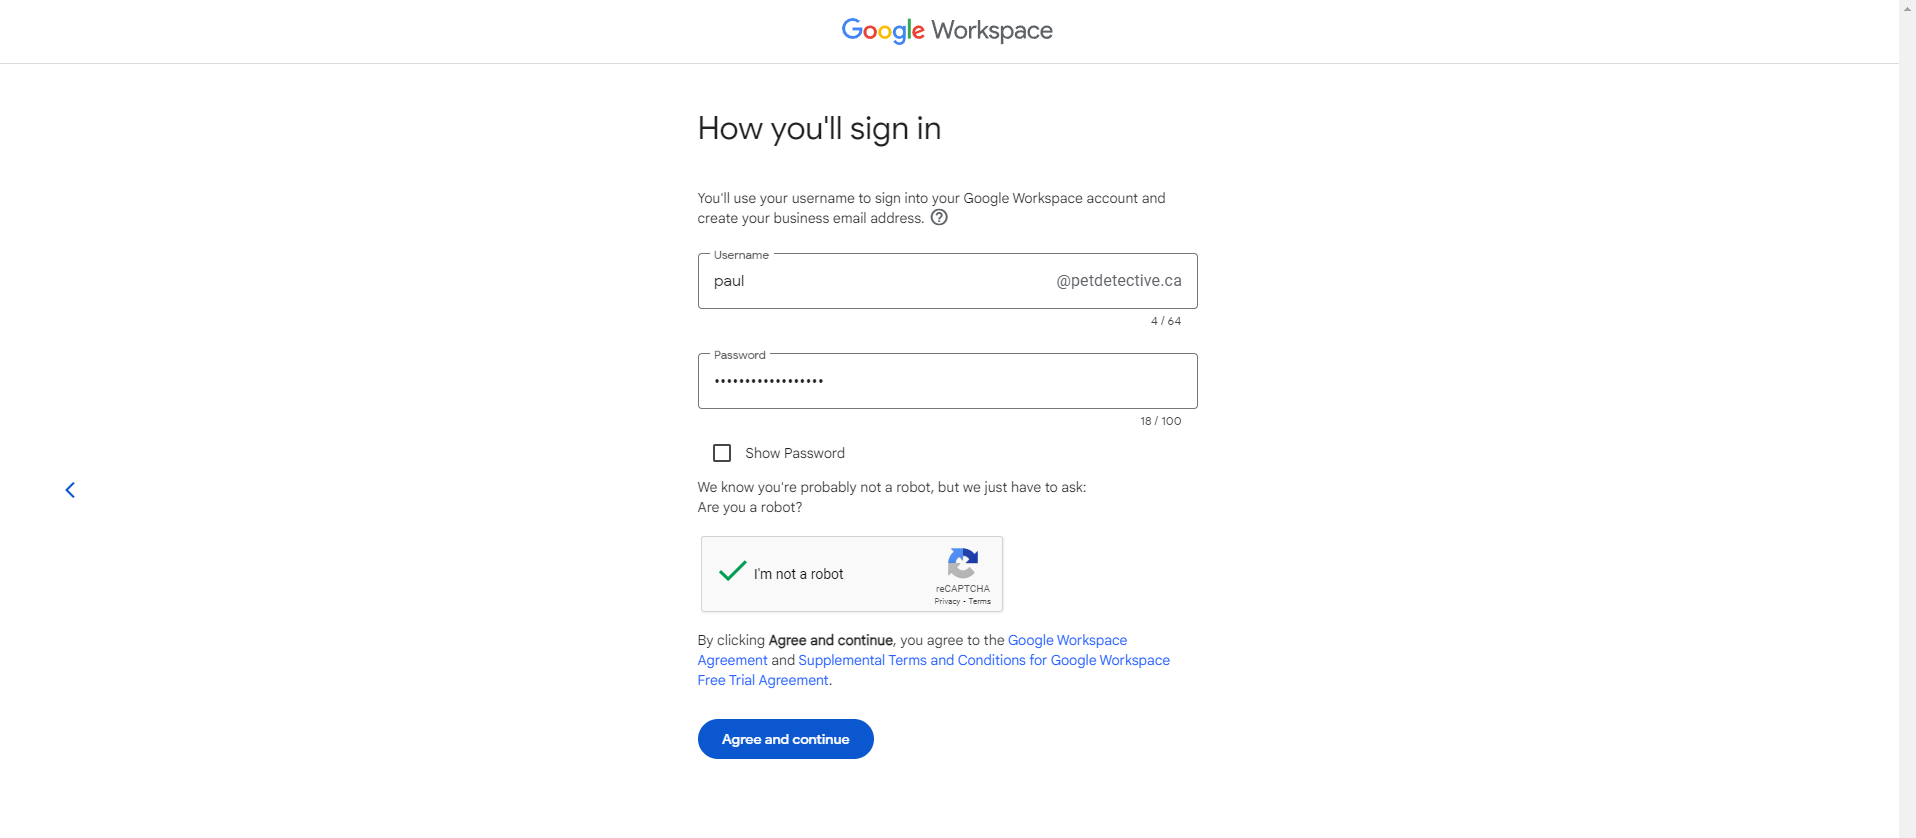
Standardizing professional email addresses as a part of your Google Workspace setup
When choosing a username, make sure to use a format that will be consistent throughout your organization. Here, we opted for “firstname@petdetective.ca”—all of our subsequent email addresses should follow this format. You could instead opt for “first.x@yourdomain.com” or “first.last@yourdomain.com”—whatever works best for your business. Keep it consistent!
Finally, we can choose our plan:
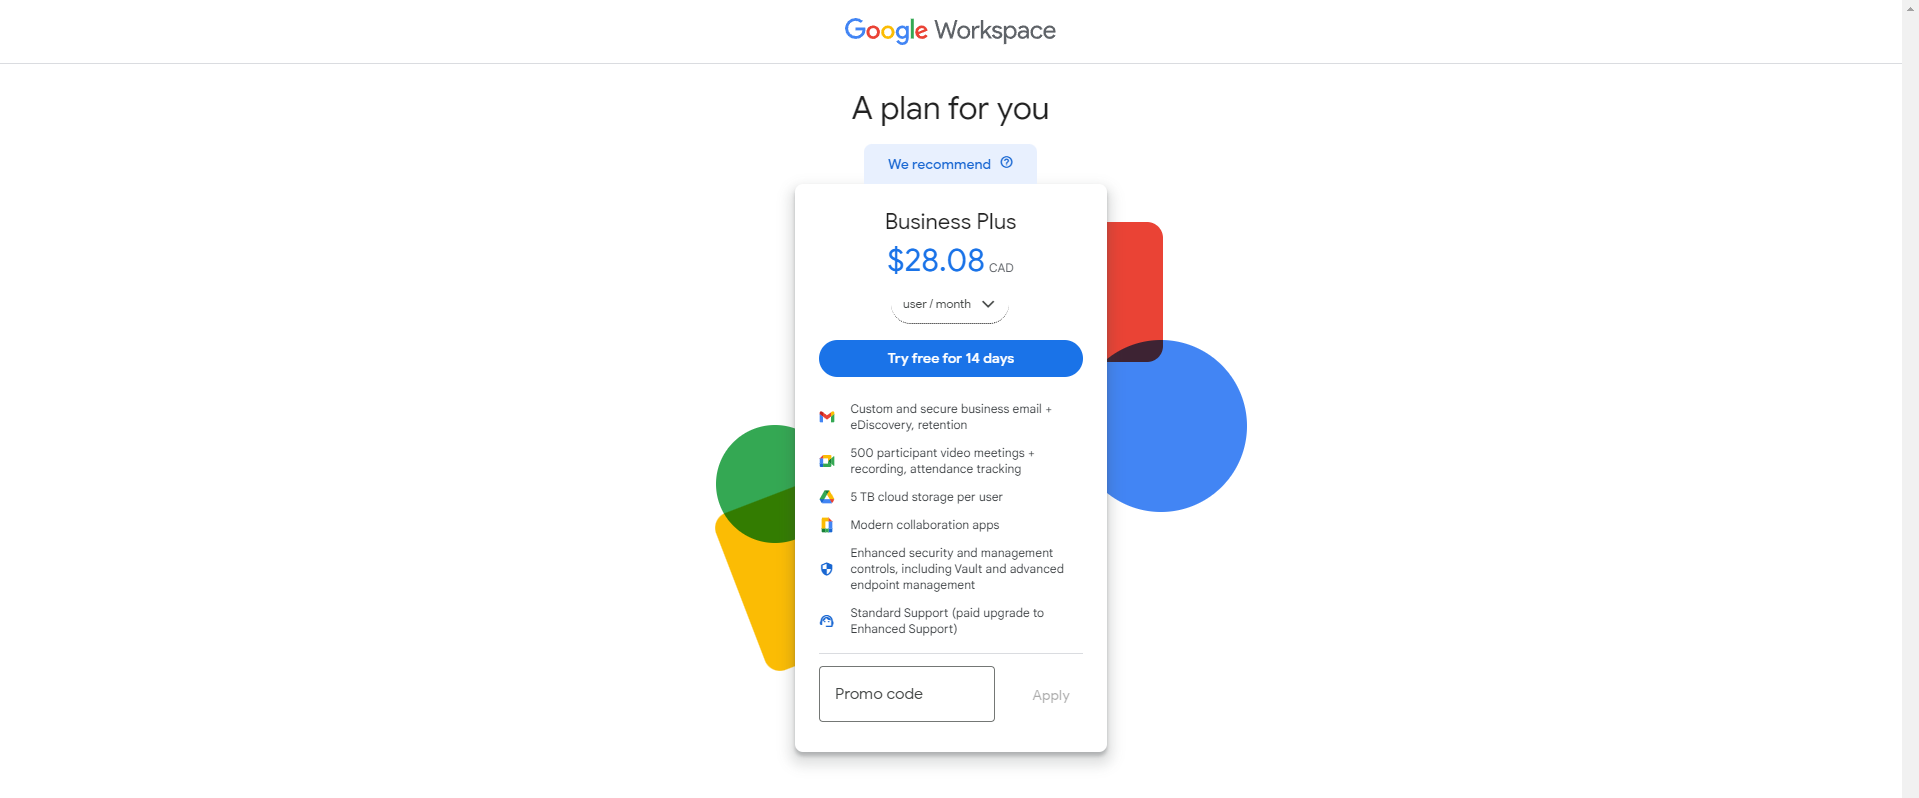
Here, Google recommended its Business Plus plan to us based on the information we provided about the number of users in our Pet Detective business. You may be given a different plan based on the information you provided. Add any promo codes you may have, then press the “Try free for 14 days” button to get started.
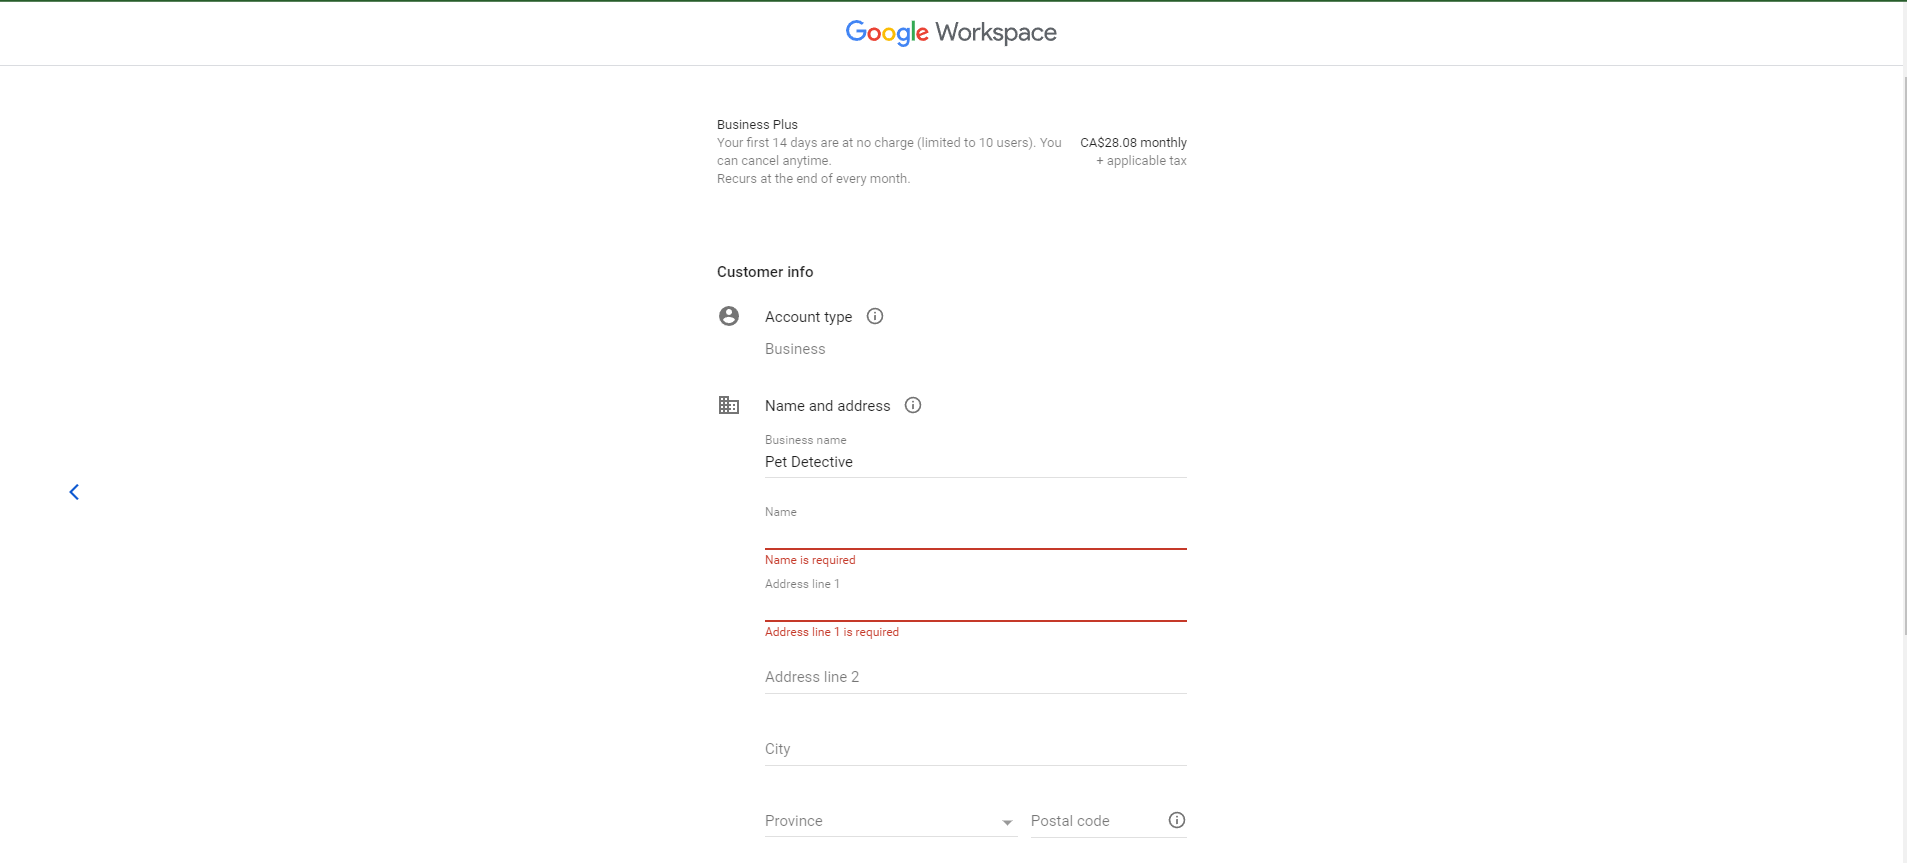
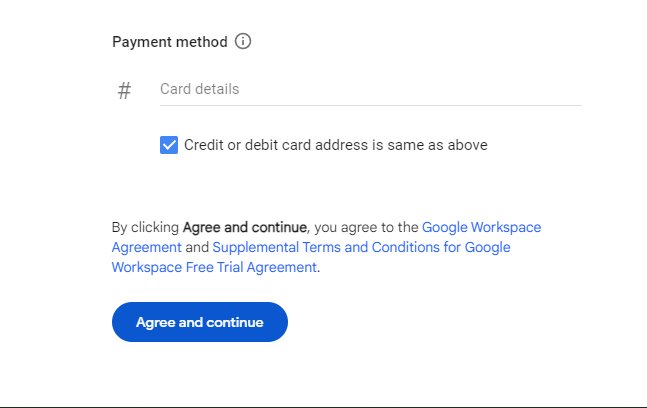
On this page, you’ll need to fill in your contact information and add credit card information for the recurring payments.
With that, you’re all signed up for your new Google Workspace account! You may be asked to log in using the username and password you set up on the “How you’ll sign in” page. From there, you’ll agree to terms and services. You’ll then be redirected to the Admin page:
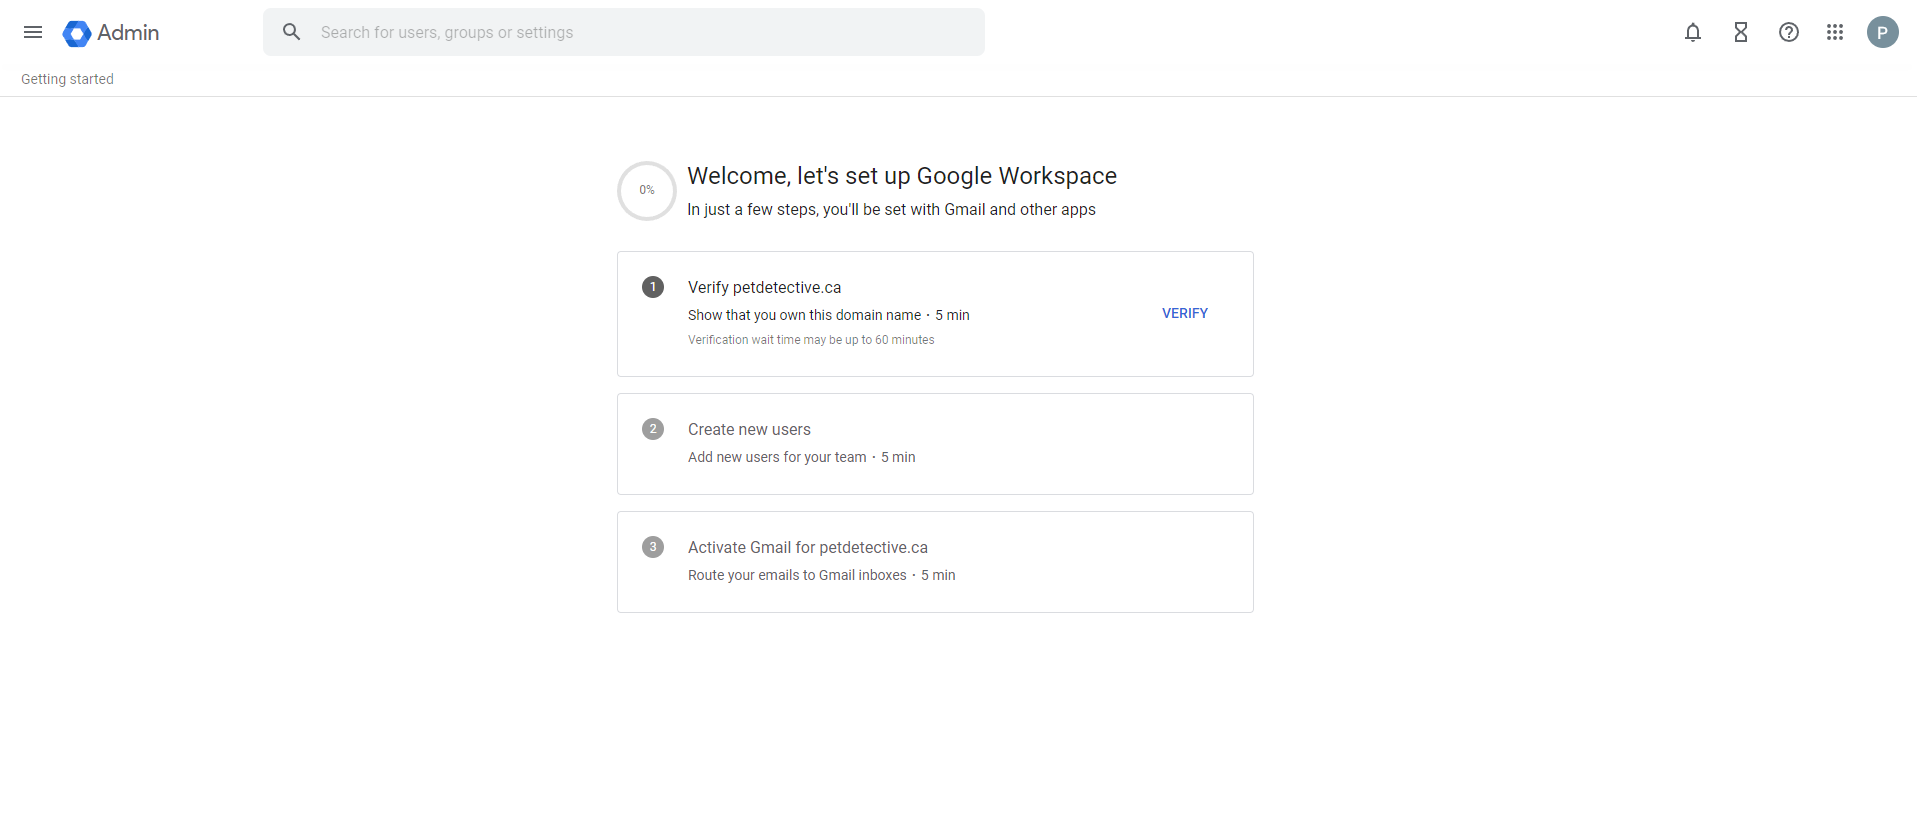
We’ll complete the rest of the setup using this Admin page and other resources.
Step 2: Verify Your Domain
Now, we’ll link our domain to our Google Workspace—simply press the “Verify” button. We’re then brought to a screen with very simple instructions:
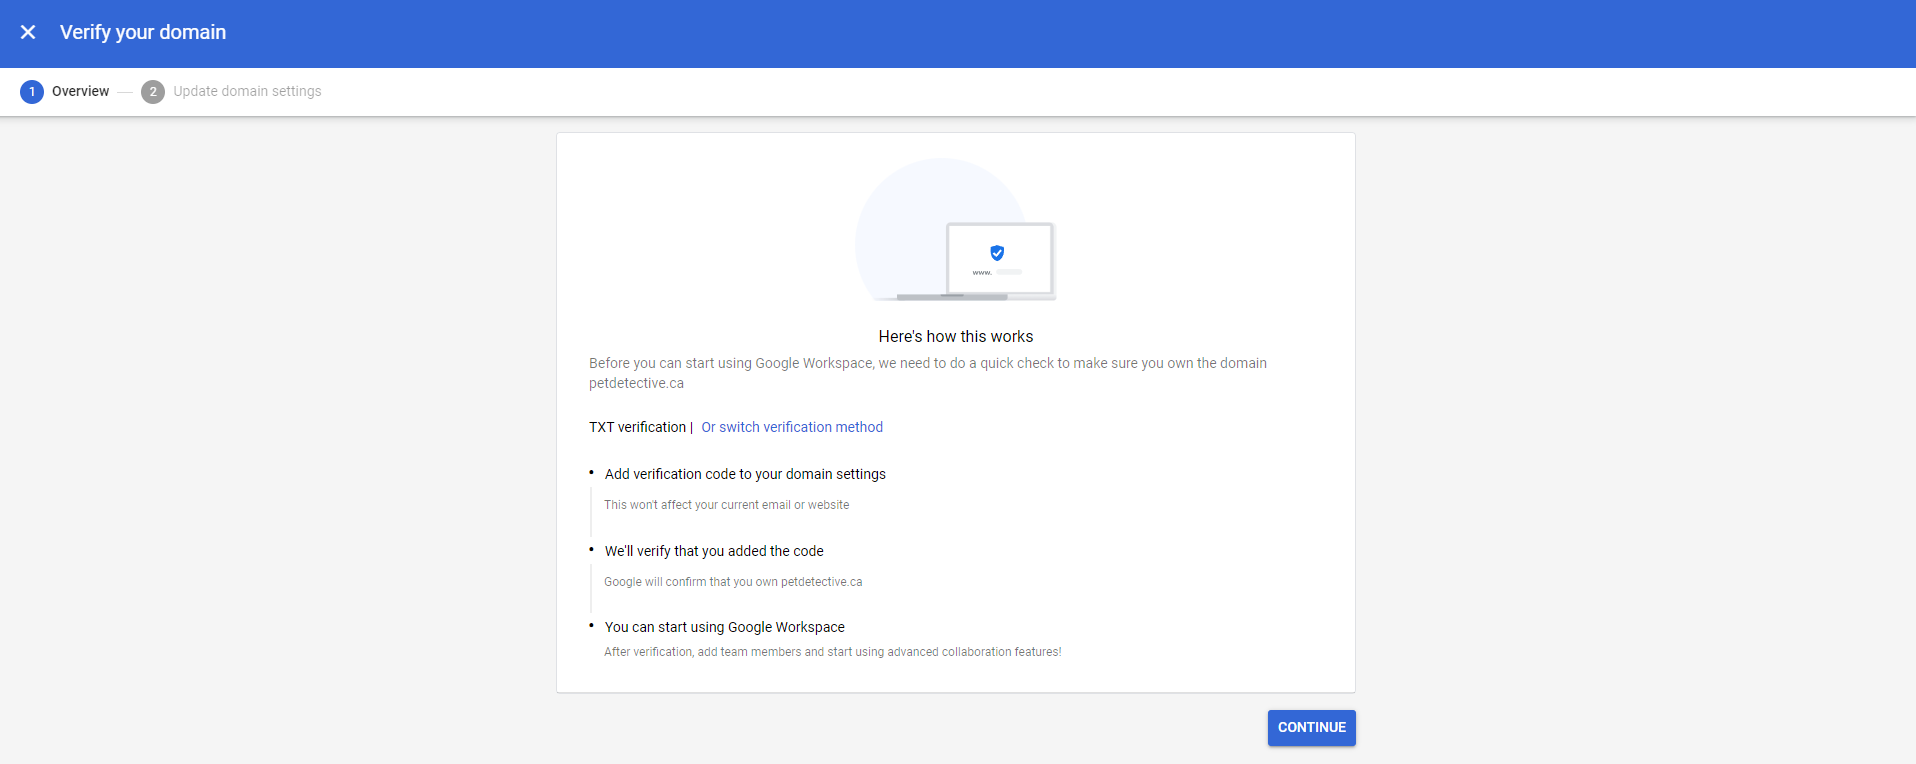
We recommend using the TXT verification method—you can switch to CNAME verification if you prefer, but TXT should work perfectly for most people reading this guide. Once you’ve chosen your preferred verification method, click “Continue”.
You’ll be met by a page that may look daunting, but don’t worry: It’s easy to set up TXT verification with most domain hosts.
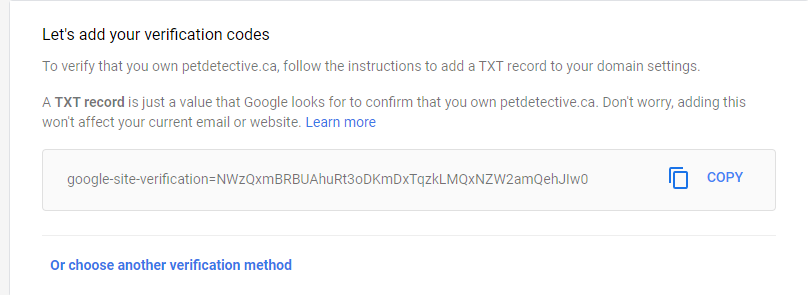
The first part of the page is simply the code you’ll need to copy and paste—we don’t even need to copy it yet, as Google will give us another chance to later on.
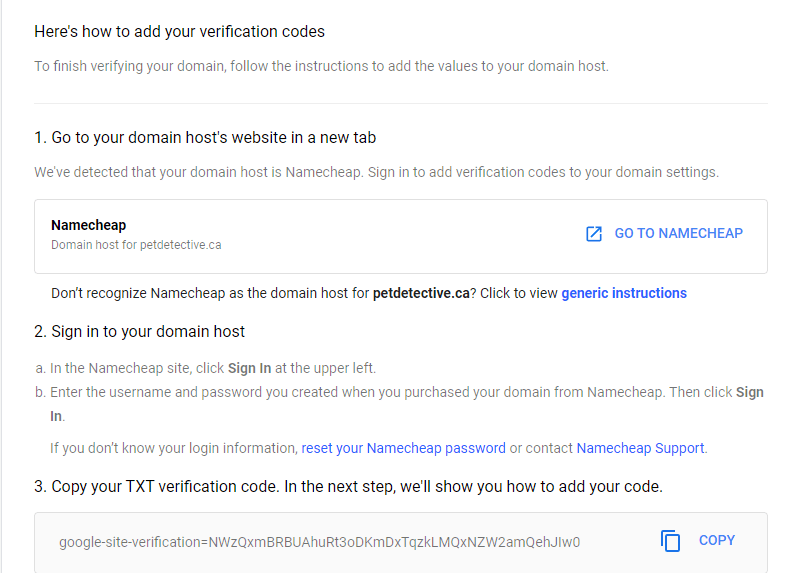
Our site, petdetective.ca, was registered using Namecheap. You may have registered your domain using another domain host—Google will automatically recognize most domain hosts and give you instructions to help you complete TXT verification. For the rest of this guide, we’ll be following the instructions for TXT verification using Namecheap—in most cases, you’ll find the domain host you use follows a similar methodology.
We click “Go to Namecheap” to open our domain host’s site in a different window:
We’ll then hover over the Sign In button at the top left:

Once we’ve signed in, we go back to the Google Workspace Admin page and copy our TXT verification code:

From there, we follow the following instructions:
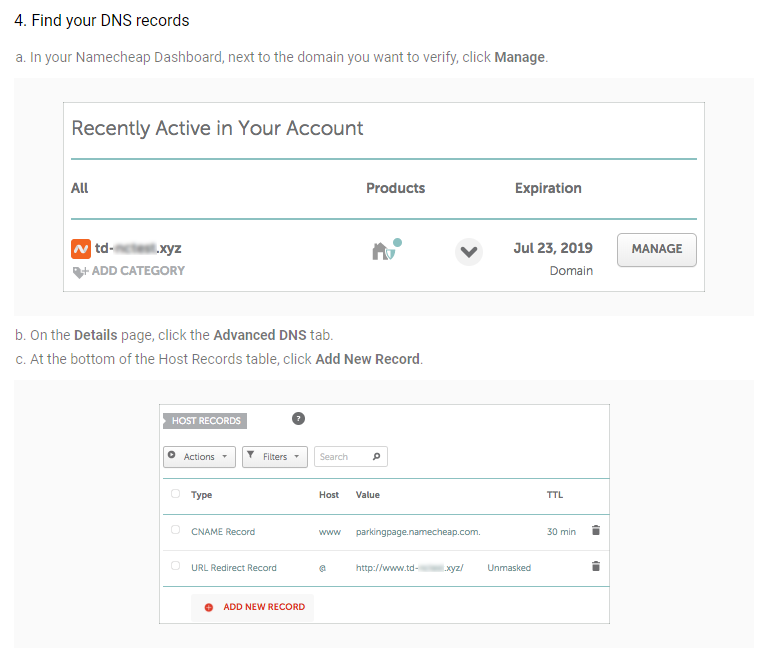
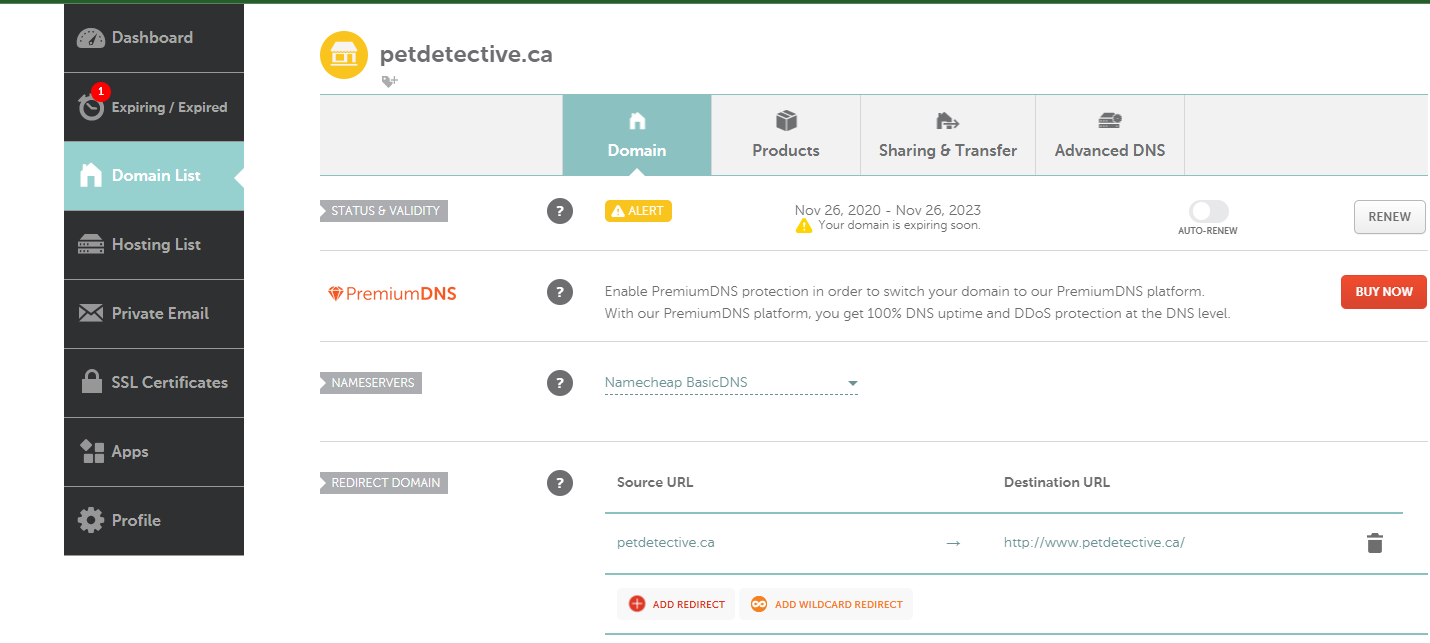
Google does an excellent job with most domain hosts. We see a very similar page on our Namecheap dashboard:
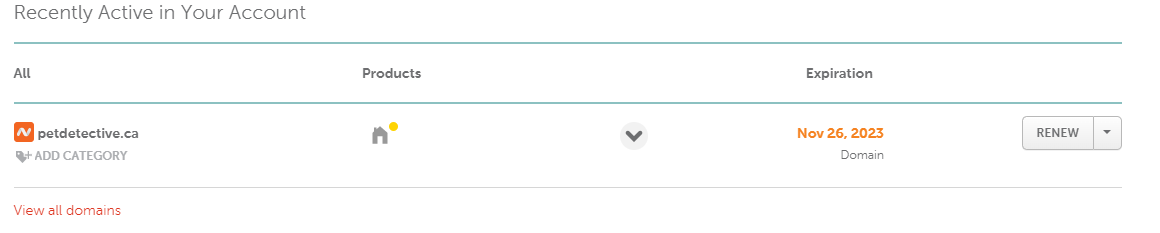
Instead of a “Manage” button, we have a “Renew” button because the domain is coming up for renewal. Pressing the down arrow allows us to find the “Manage” button—if your domain is up for renewal, you may come across a similar button.
We must then follow these steps:
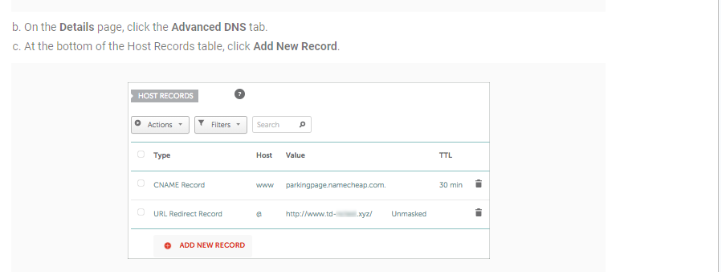
We can find “Advanced DNS” in the header of the “Domain List” page. From there, we can press “Add New Record”:
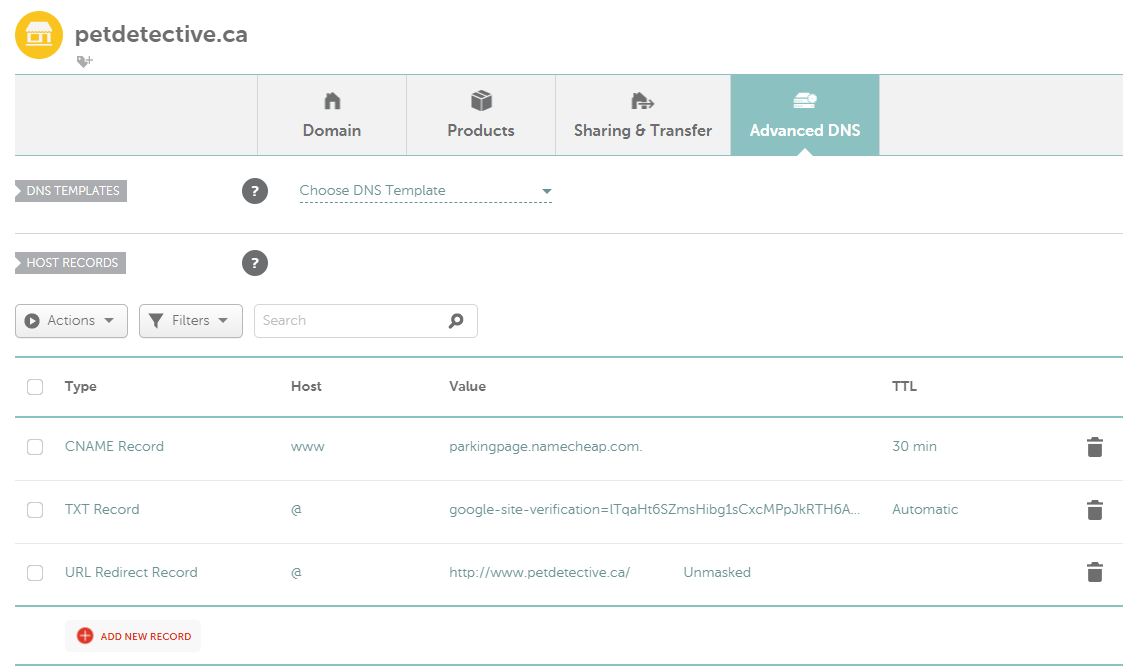
You’ll note that we have another TXT Record on this page—this is for another Google Site Verification. Google uses TXT verification for a number of its tools.
We can now move to adding our TXT record for TXT verification:
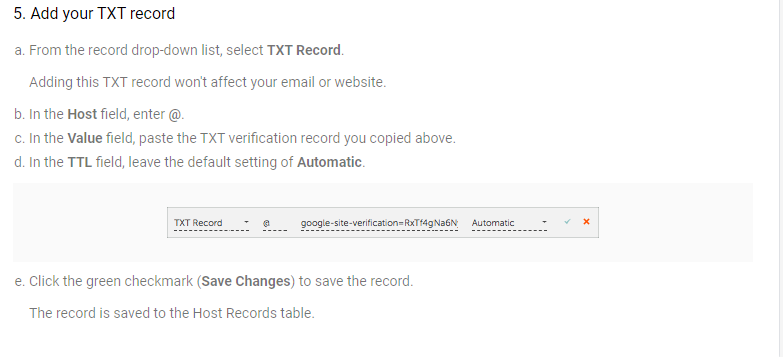
We enter @ in the Host field, paste our TXT verification record, and leave the TTL field alone. This is what it looks like:

From there, we simply hit the green checkmark.
Once that’s done, we return to the Google Workspace Admin page and click “Verify My Domain”.
Note that domain verification can take some time—Google is giving us a 5-minute timer for this domain verification, but the process can even take 24-48 hours in worst-case scenarios. Go grab lunch and come back for Step 3!
Step 3: Add Users to Google Workspace
Now that you’ve enjoyed your lunch, go back to your Google Workspace, then click “Admin Console” in the top right corner.
You may be asked to sign in again. From there, you’ll see a page full of different info panels—right now, we’ll concentrate on “Users”:
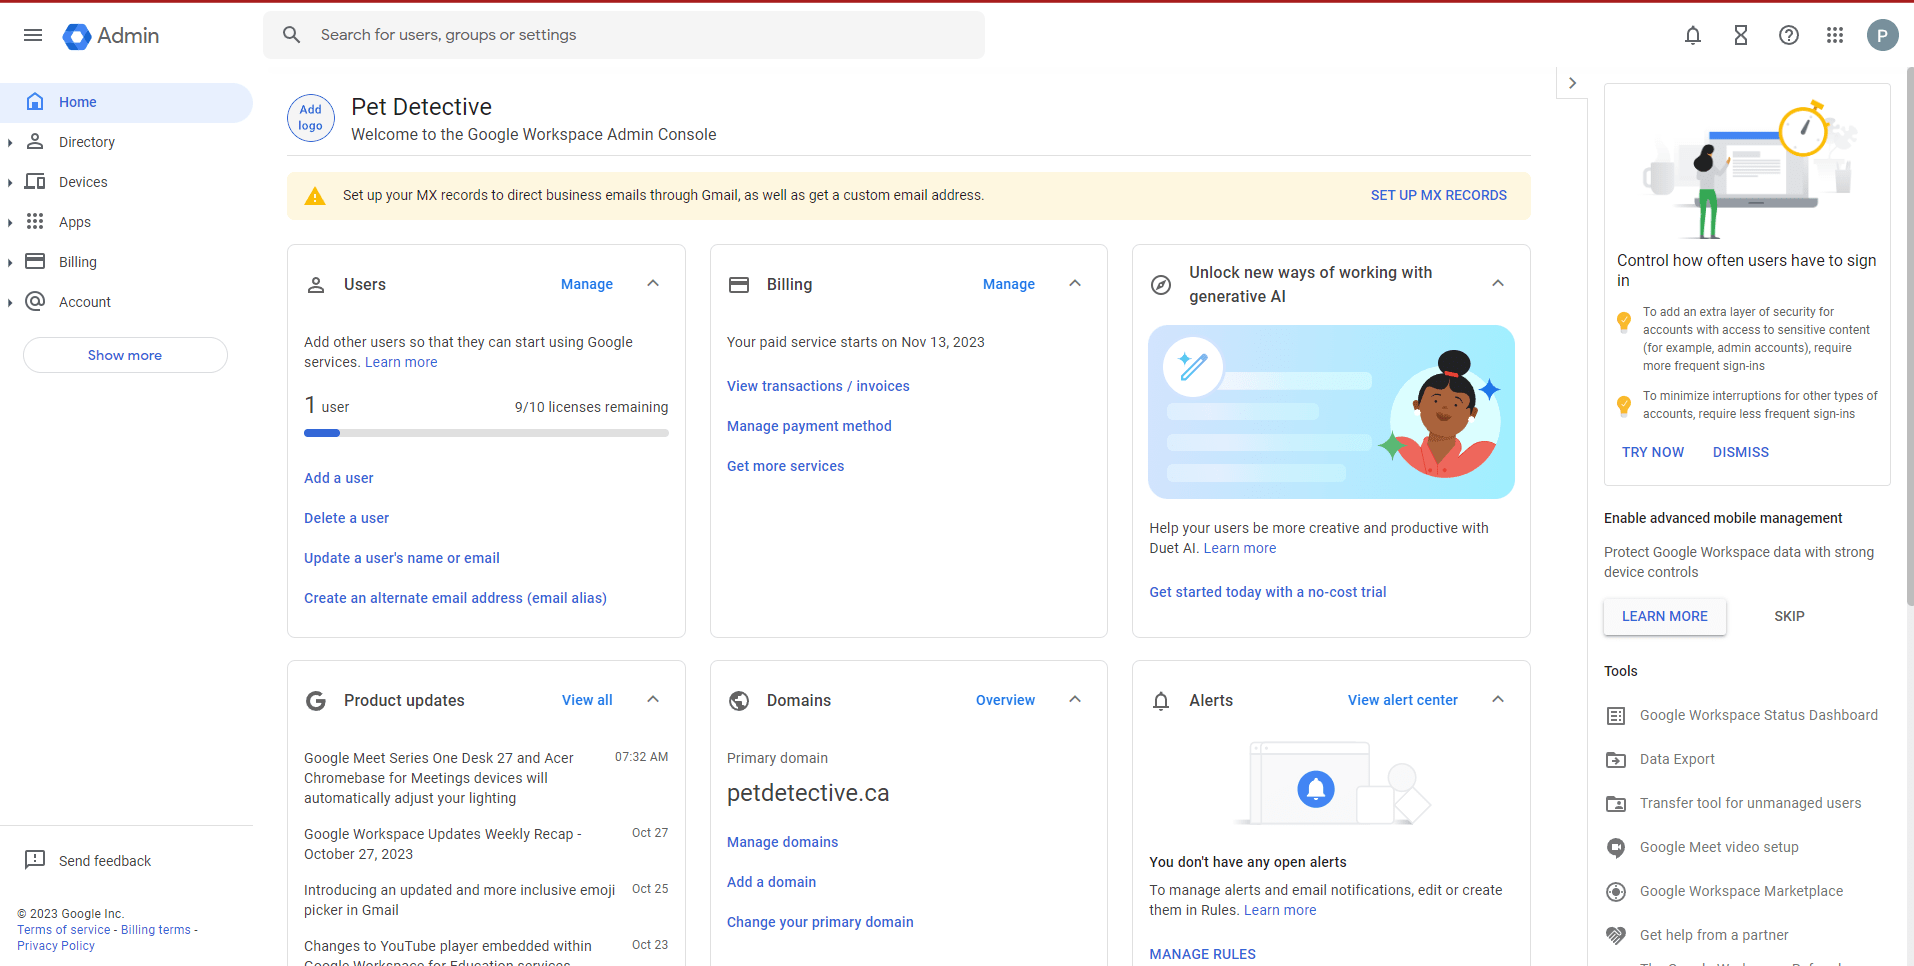
By clicking “Add a User” you’ll be presented with this form:
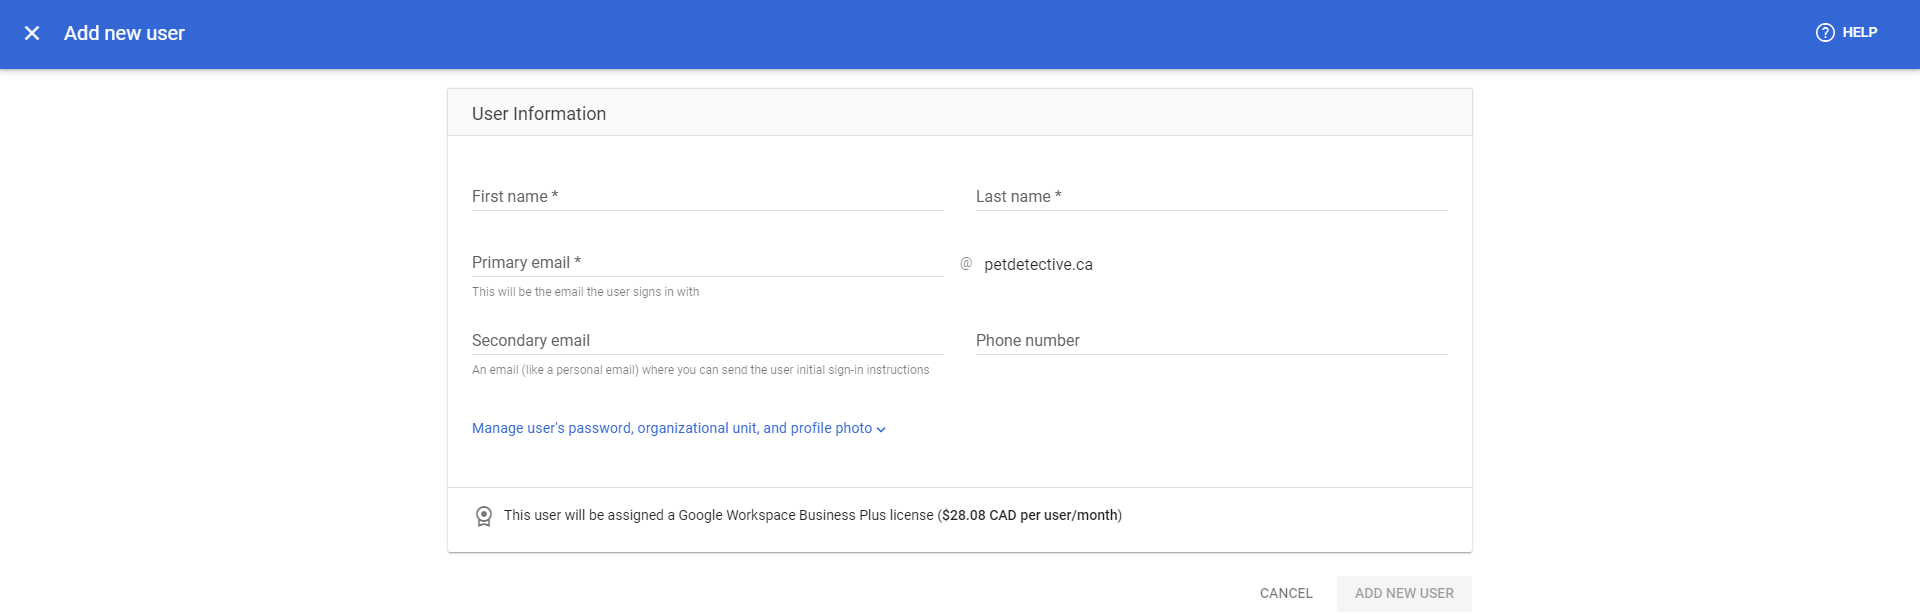
Simply fill out the form, then click “Add New User”. Note that adding a new user to your Google Workspace comes at a cost—you need to pay for a full licence (in our case, $28.08/month).
You can also create email aliases: These are alternative emails that redirect to a user’s inbox. They can be useful for white-labelling, managing certain accounts, and filtering emails. You can add up to 30 aliases for each user.
We recommend creating your “info@”, “admin@”, and other similar aliases here—it’s an easy way to track and sort where your mail is coming from.
Step 4: Add MX Records
On your Google Admin Console page, you’ll notice a little warning near the top:
Click on “Set up MX Records”. This is the most technical part of the process—but it’s also the last part, so you’re almost done! You may be asked to sign in again. Once you have, you’ll be met with a familiar page:
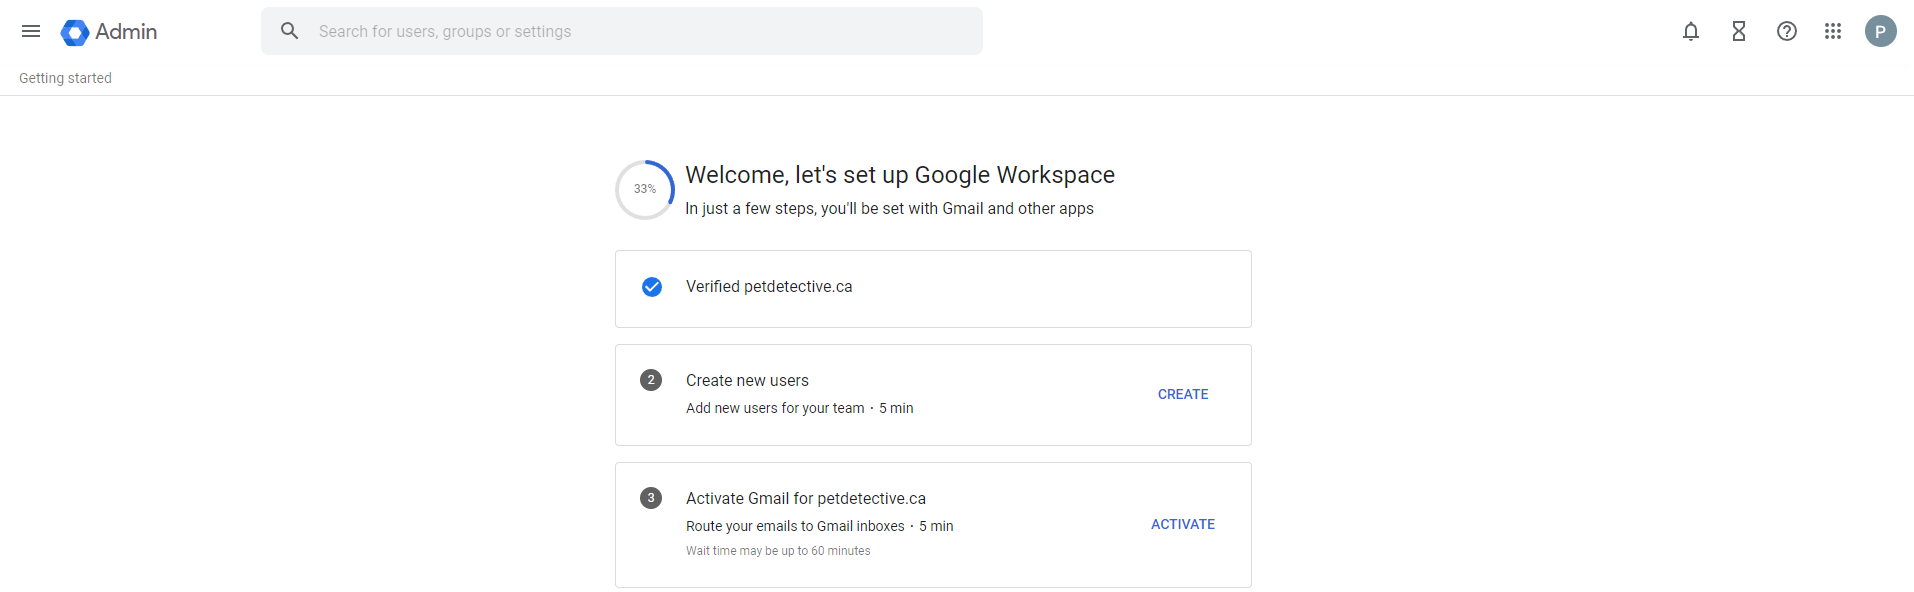
We haven’t added new users for our petdetective.ca domain (it’s just an example page for now), but we can click “Activate” by “Activate Gmail for petdetective.ca” to set up our MX records.
You’ll be greeted with this page:
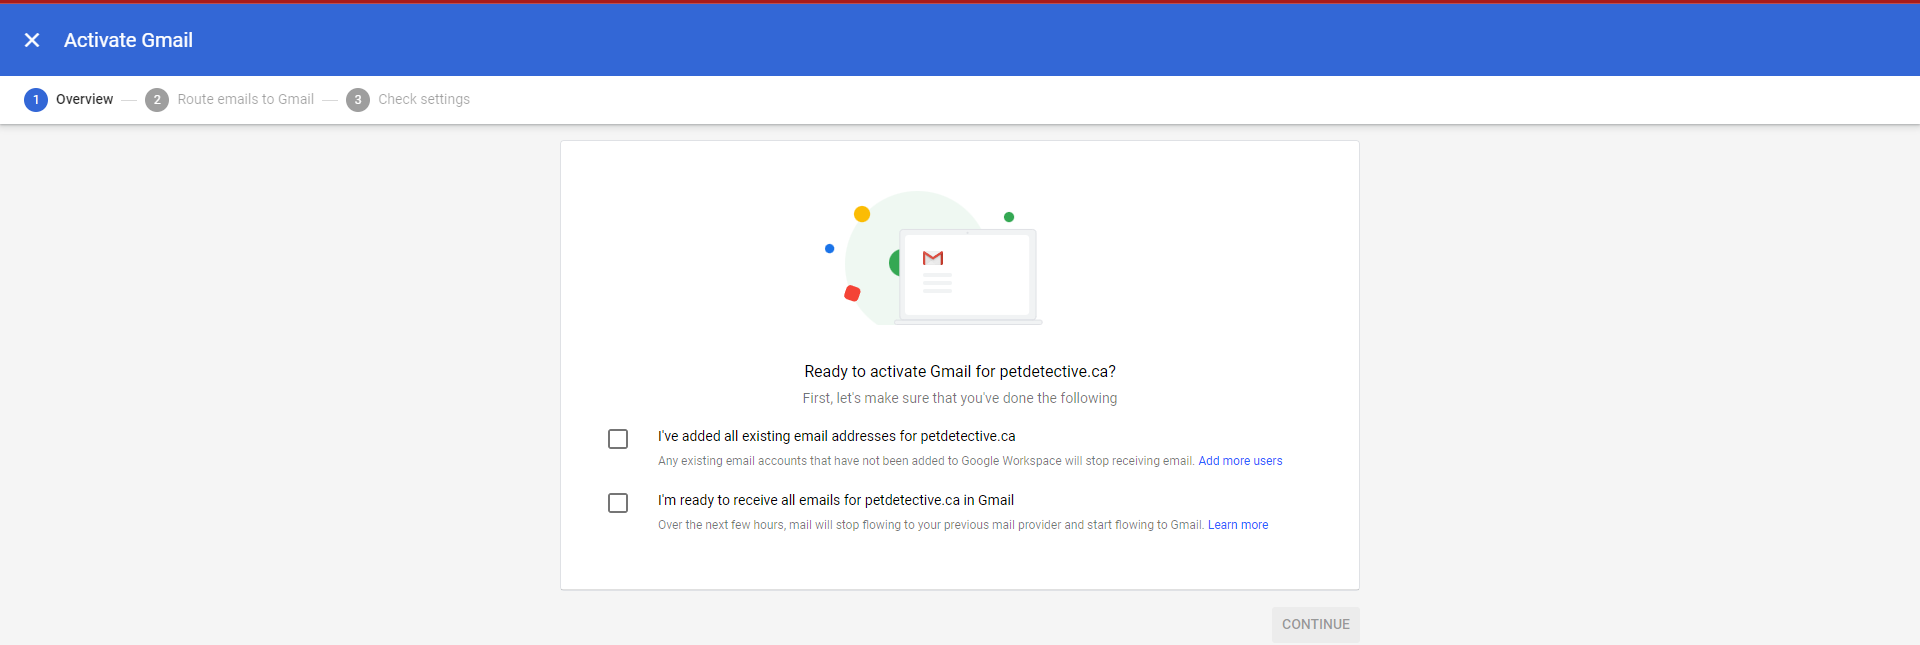
Make sure you’ve ported all of your email addresses over, as they’ll stop receiving emails after this step if you don’t. Check both boxes, then click continue.
Once again, we’re greeted by a page full of instructions. As a reminder, your instructions may look different—we’re using Namecheap, but you may be using another domain host.
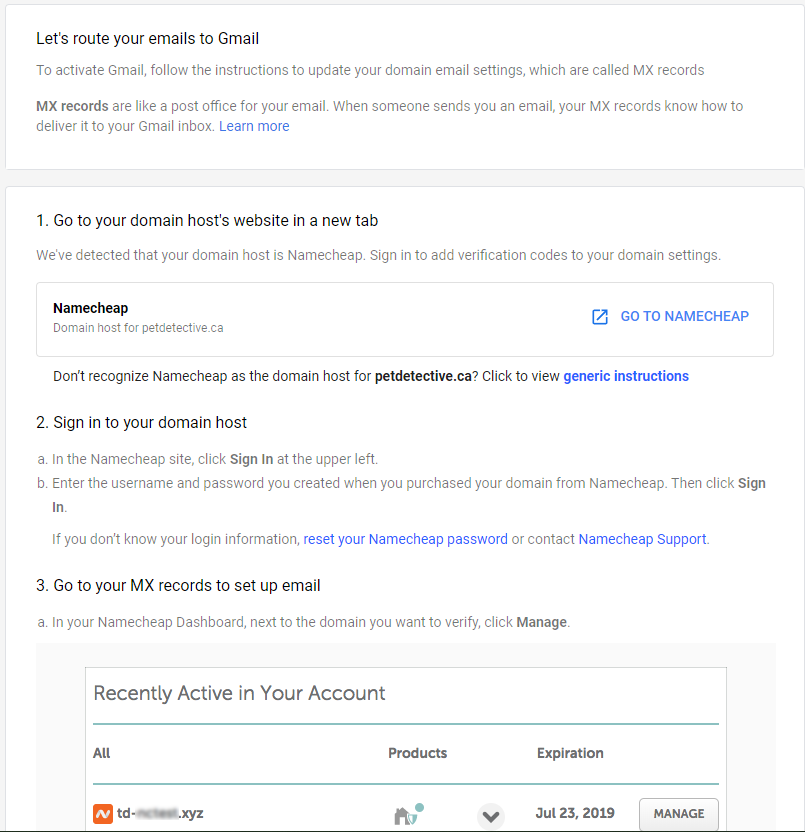
Again, we’ll go to Namecheap and sign in. We’ll then go to “Manage” in our Dashboard. From there, we’ll follow Google’s instructions:
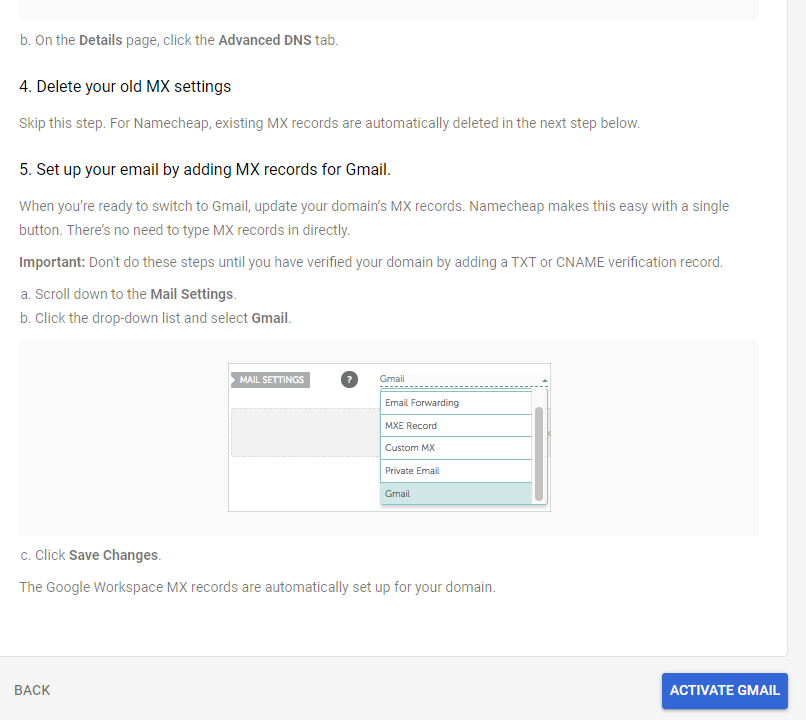
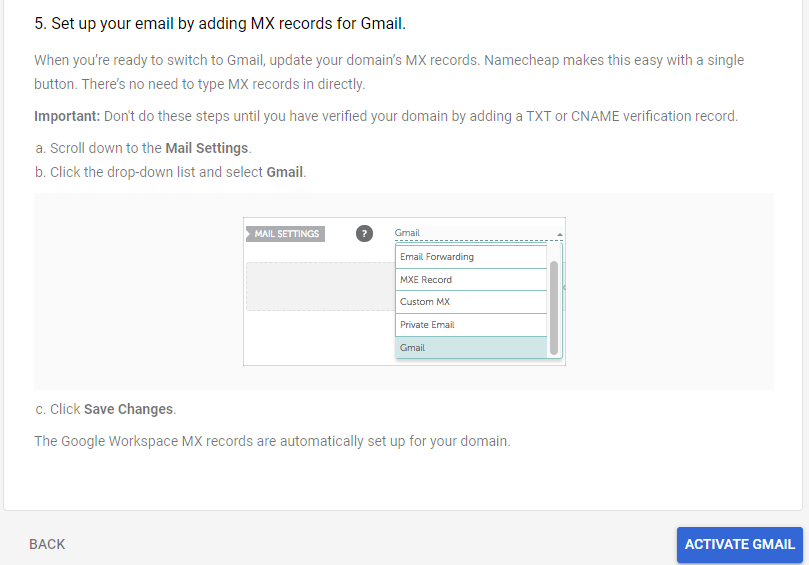
Here, you’ll note that Namecheap automatically deletes old MX records—your domain host may act differently. It’s important to follow the instructions as given by Google—this guide is only one example of the instructions you may need to follow to set up your Google Workspace and professional email with Gmail.
For petdetective.ca, we simply go to the Advanced DNS tab, scroll down to Mail Settings, and click “Gmail” from the dropdown list. Namecheap automatically configures the rest. We then click “Save changes”.
With this step completed, we click “Activate Gmail” back on our Google Admin page:
From there, we’re met by a page full of verifications. Sit tight, allow the verifications to occur, and you should be met by this page:
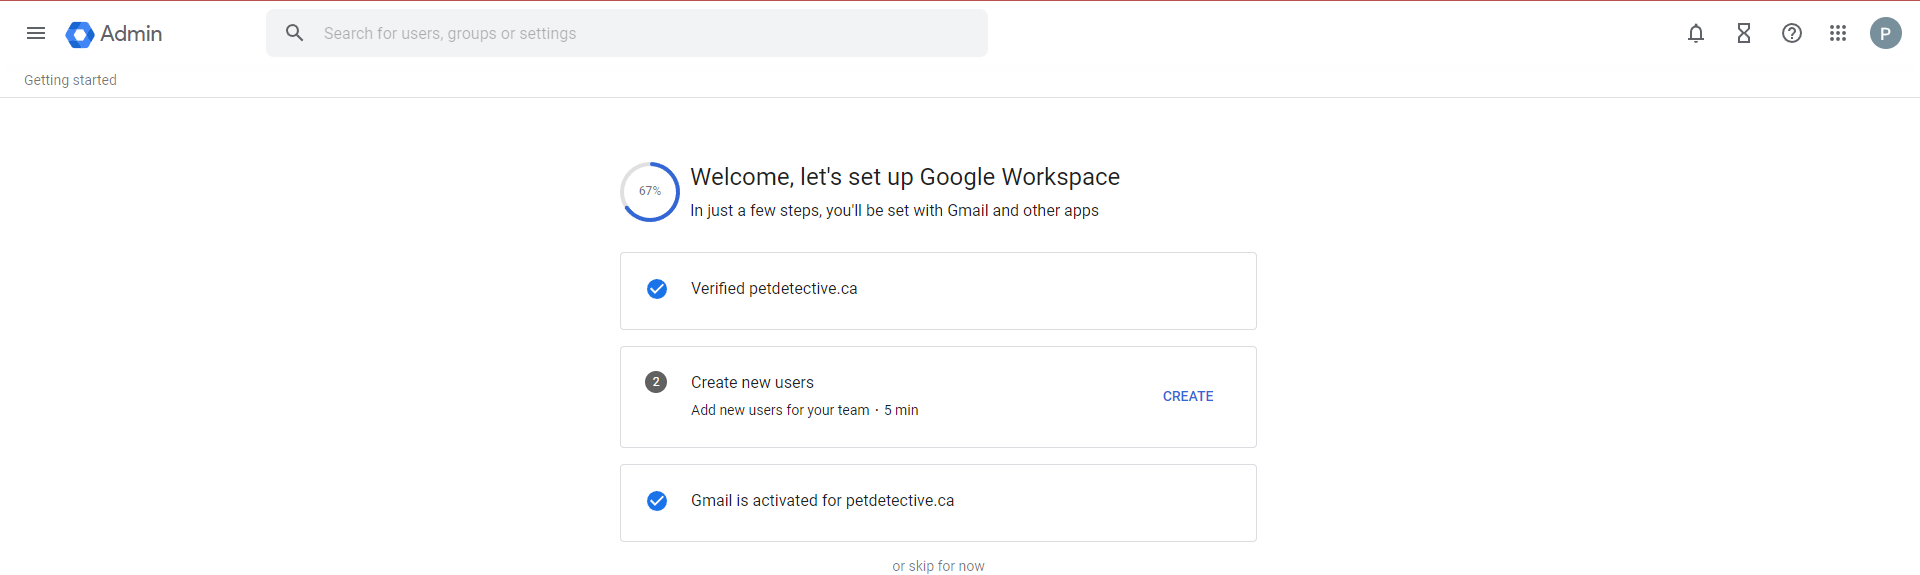
Given that we’re not adding any extra users, we can click “or skip for now” at the bottom. Just like that, we’ve set up our professional Gmail! You’ll be met by the following page:
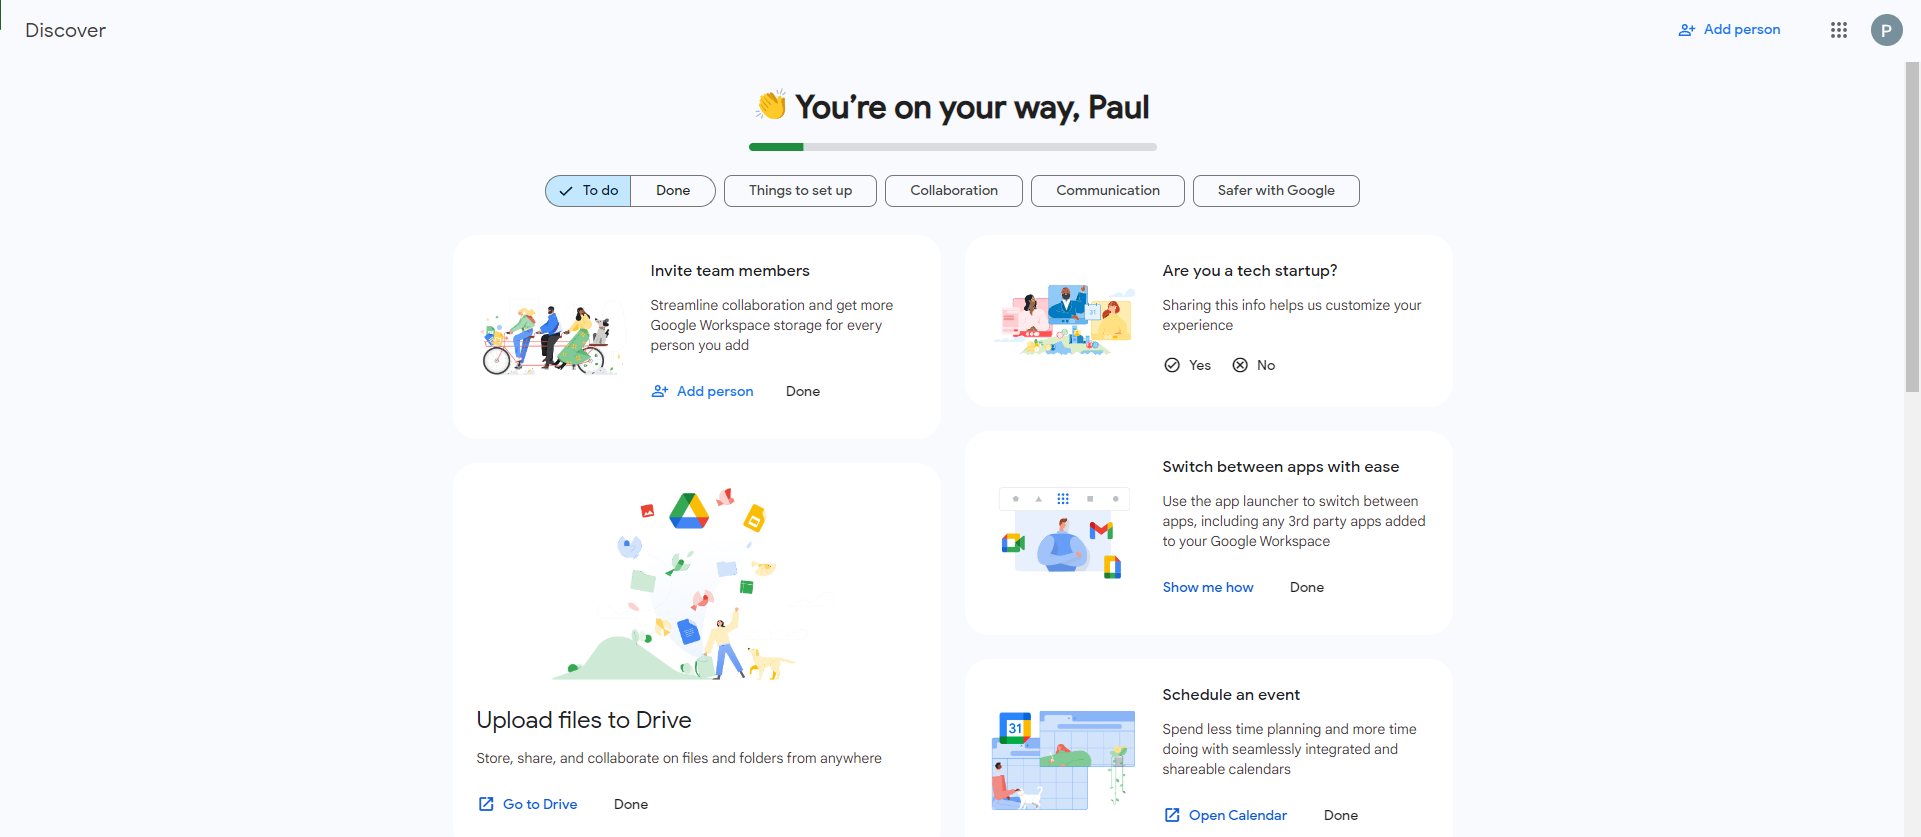
*Note that unless your name is also Paul (great name if it is!), the “You’re on your way” message will be a bit different.
Scroll down from here, and you’ll see the following panel:
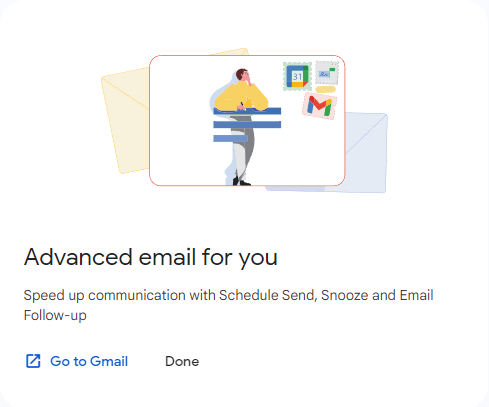
Click “Go to Gmail” and you’ll be greeted by your new professional email account.
Congratulations—you’ve just set up Google Workspace and a professional email with Gmail!
Conclusion
With your new Google Workspace account configured, your domain verified, and your MX records set up, you’ll now be able to use Gmail to handle all of your business emails. Feel free to add other users and create aliases any time you need to—just remember the additional costs!
Here at First Rank, we don’t manage emails—that’s Google’s domain. This guide is here to help, but if you’re ever unsure about how to configure your Gmail account or if you run into any issues, don’t be afraid to contact Google Support.
We’ve created this guide to help our clients get professional email addresses to handle all the leads we generate through SEO. Looking to boost your web traffic? Contact us.
Jacob Kettner is the owner and CEO of First Rank Inc., a digital marketing agency based in Winnipeg, Manitoba. He currently sits on Manitoba Chamber of Commerce Small Business Advisor Council which assists people grow their small businesses in Manitoba.