A Comprehensive Guide to Technical SEO
Search engine optimization (SEO) is constantly changing, and technical SEO is one of the most important parts of any SEO campaign. To reflect the many changes that have occurred in our industry, we’ve updated our technical SEO guide for 2025. Here are a few of the changes to our guide:
- Reformatted for ease of use
- A more comprehensive list of tools and their uses
- New information on Core Web Vitals (including the new metric, Interaction to Next Paint)
- A simplified, more actionable look at redirects, robots.txt, and other technical optimizations
Table Of Contents


What is Technical SEO?
Most SEO work can be divided into three categories: Technical, on-page, and off-page. As we focus on technical SEO throughout this article, it’s important to understand what the other two main categories of SEO are; this will make it easier to understand what technical SEO isn’t.
Why Technical SEO Matters
Want your website to show up when users search for relevant queries? You need technical SEO. According to Datos and SparkToro, over 70% of traffic referrals on the internet originate from search engines, with Google accounting for 63.41%.
When users cannot find your website on Google or other search engines, you are missing out on a potent source of lead generation. The higher you rank on search engines for relevant keywords, the more qualified leads you’re likely to get.
Without technical SEO, your website is far less likely to rank well on search engines. Your users may experience slow loading times, security vulnerabilities, and poor navigation. You can have the best content in the world, but if your site delivers a poor user experience, you won’t get any leads.
Technical SEO matters. We’re here to teach you what it is, what it isn’t, and how to do it.
Technical SEO Vs. On-Page And Off-Page SEO
Most SEO work can be divided into three categories: Technical, on-page, and off-page. As we focus on technical SEO throughout this article, it’s important to understand what the other two main categories of SEO are; this will make it easier to understand what technical SEO isn’t.
Technical SEO
Imagine you’re going to a live show; it could be a sports game, a concert, or a play. To get the show running and keep it running, you need to balance lighting, sound, security, capacity, and more. Audience members might not even notice that you’re doing this essential work—but they would certainly notice if it weren’t done. The same is true of technical SEO.
Technical SEO takes place mostly on the back end of a website; changes and fixes are largely imperceptible to front-end users, though they may improve site speed.
Front-end technical SEO might include changing a site’s architecture, navigation, user interface (UI), and user experience (UX). Technical SEO fixes and changes may include:
- Security updates
- Site speed improvements
- Image optimization
- Minifying JS/CSS
- Improved caching
- Accessibility improvements
- Adding and optimizing schema
- Canonicalization/pagination
- UX/UI updates
On-Page SEO
On-page SEO is all about content; if technical SEO is the work being done to make the show possible, on-page SEO is the performance itself. In short, on-page SEO is the reason that people are actually visiting your site—it would fall flat without the all-important technical work, and it is the main draw of your website.
Content is a pretty broad term; it can include videos, blogs, infographics, and more. When you think about on-page SEO, think about the things that are adding tangible value to your site, including:
- High-quality content
- Strong internal links
- Pages for each keyword you are targeting
- Engaging titles and headings
- Page titles and meta descriptions that encourage clicks
Off-Page SEO
Where technical SEO is the lighting and sound, and on-page SEO is the performance, off-page SEO is the cool friend with immaculate taste who is always inviting you to interesting shows.
The goal of off-page SEO is to earn links from websites in your niche and in your location; websites that Google already trusts, and whose recommendations (links) it will take into account when ranking your site.
Off-page SEO may include:
- Press releases
- Guest posts
- Skyscraper content
- Citation building
- Outreach
- And other techniques to earn backlinks
How Google's Crawler Works
In order to find pages (a process known as crawling) and make them eligible to be displayed in search results (a process known as indexing), Google uses a crawler called Googlebot.
Googlebot primarily relies on links from sites it has already crawled to find and index new pages. Additionally, Googlebot will crawl pages when sitemaps have been submitted through Google Search Console. Sitemaps are a core element of technical SEO that we’ll cover in greater detail later in this article.
Not all web pages are created equally; there are trillions of different URLs on the web, and crawling and indexing all of these pages would be a waste of Google’s resources. As such, Googlebot has a number of pages it will not crawl, and other pages it will not index. For a page to be eligible to be crawled and indexed, it must meet certain standards:
- The page must be publicly accessible (not hidden behind a login page)
- The page must not be excluded from crawling or indexing in robots.txt (more on that later)
- The page must meet certain quality standards. Googlebot prioritizes pages that:
- Provide high-quality, original content
- Load quickly
- Have a user-friendly design
- Are responsive (work on all devices)
- Are secure
- Have an easy-to-understand URL
- Have high-quality external links
- Are well-linked internally
- Feature properly formatted schema
Those are just a few of the rules and guidelines that Googlebot operates by—and as you can see, the vast majority of the points that Googlebot considers are technical in nature.
Googlebot assigns every site a crawl budget—a number of pages it will crawl and index in a given period of time. Well-optimized sites have higher crawl budgets. Want your page to get crawled and indexed quickly? You need technical SEO.
Where Technical SEO Fits In An SEO Campaign
Technical SEO is the #1 priority at the start of most SEO campaigns; as the campaign progresses, technical SEO fixes will still occur, but less frequently.
By frontloading technical SEO at the start of a campaign, you’re setting yourself up for success. A lot of technical SEO happens thanks to plug-ins and sitewide modifications that perpetually fix issues as they arise. Once those plug-ins and modifications are in place, manual fixes like site architecture changes and bolstering internal linking can take place.
When the entire site has been optimized, it’s much easier to simply follow the new conventions set in place when creating new pages. Technical problems may still arise, changes to Google’s algorithm may necessitate new technical fixes, and new plug-ins might optimize a site even further, so technical SEO is an ongoing concern, but the work becomes much easier if most of the site is optimized as early in the process as possible.
What Technical SEO Consists Of
Fixing Crawling And Indexing Issues
One of the first steps to any technical SEO plan is ensuring that your site is properly crawled and indexed. The best way to find out whether or not a page has been crawled or indexed is through Google Search Console (GSC), an essential tool for any SEO project. Later in this article, we’ll discuss GSC in greater depth. For now, take a look at these crawling and indexing errors from our own website:
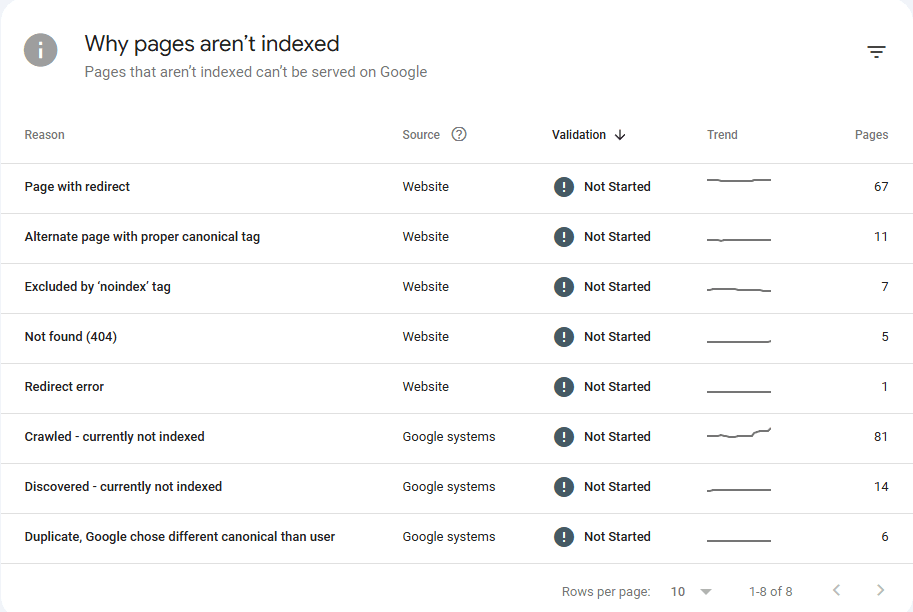
There are two insights we want you to gain from looking at this image:
- There are lots of reasons why pages are not crawled or indexed
- Technical SEO is an ongoing process; we are an SEO company, and even we have potential technical SEO fixes on our website
As we progress through this section of the article, we will cover a number of the indexing issues you see here. You should know, however, that not all indexing issues need to be addressed. For example, pages with proper canonical tags and pages excluded by the ‘noindex’ tag do not need to be indexed.
How to Fix 404s
404 means “Page Not Found”. 404s occur when a page was removed or if a page never existed but was linked to or added to a sitemap by error. There are a number of different solutions for 404 errors. Here are a few:
- Create a page that matches the URL in question
- Redirect from the affected URL to a live page
- Tell Google to ignore the affected URL
- Change links that point to the affected URL
Implementing And Fixing Redirections
Redirecting traffic from one page to another page is an extremely valuable tool. The most commonly used redirect is the 301—it tells search engines and users that a page has been permanently moved to a new URL. You may use 301 redirects to:
- Ensure that http: URLs are automatically changed to https: (more on this later)
- Restructure your website
- Merge content
- Redirect from 404s
Redirects are a powerful tool, but they must be used carefully. Every time one URL redirects to another, Googlebot sees it as another page to crawl—and Googlebot has a limited crawl budget.
Imagine a URL redirects to another URL. You decide that the URL is no longer suitable, so you redirect it to yet another URL. After that, you redirect it to a 4th page. If Google crawls the initial URL, it has to go:
First URL->Second URL->Third URL->Fourth URL
Googlebot may then attempt to crawl the second URL based on the links it’s found:
Second URL->Third URL->Fourth URL
This is known as a “redirect chain”; eliminating redirect chains is best practice. Instead, the first, second, and third URLs should all point directly to the fourth URL. Here’s what our crawl would look like in those circumstances:
First URL->Fourth URL
Second URL->Fourth URL
Google has now crawled 4 URLs instead of 7. This might not seem like a big change, but over the course of crawling an entire website, it can make a huge difference—especially for large ecommerce websites.
Google’s AI Overviews
The single most significant paradigm shift in search since its inception is here. Introduced in 2024, Google’s AI Overviews (formerly Search Generative Experience or SGE) fundamentally change the Search Engine Results Page (SERP). Instead of just providing a list of links, Google now often generates a direct, AI-powered answer at the very top of the page.
This is not just another feature; it’s a new “top of the page.” These AI snapshots can be massive. Sometimes over 1700 pixels tall, pushing the traditional #1 organic result far below the fold. For many informational queries, this will inevitably reduce clicks to websites, with some early studies predicting organic traffic drops of 20-60%.
In 2025, the goal of SEO is no longer simply to rank #1. The goal is to maintain visibility within this new, AI-driven landscape.
How to Adapt Your Strategy for an AI-Powered SERP
Your technical and content strategies must evolve to treat the AI Overview as both a threat and an opportunity.
Optimize for Direct Answers & Citations The AI generating these overviews gets its information from existing web pages. You need to make your content a prime source. Structure your content to provide clear, concise, and factual answers to common questions. Think like you’re optimizing for a featured snippet, but with more depth.
Action: Use Q&A formats and implement
FAQPageschema where appropriate. This makes it easy for algorithms to identify a direct question-and-answer pair on your page, increasing the chance your content will be used, and your site cited in an AI Overview.
Double Down on Unique Value and E-E-A-T If an AI can easily summarize a topic using the top 10 results, you need to provide something it can’t replicate. Your content must offer unique value that makes a user want to click through for the full story.
Action: Focus on publishing original research, proprietary data, first-hand case studies, and content with a strong, expert point of view. This aligns perfectly with Google’s emphasis on Experience, Expertise, Authoritativeness, and Trustworthiness (E-E-A-T). A generic summary can’t match genuine expertise.
Focus on Brand Visibility in a “Fewer Clicks” World Since AI Overviews often cite their sources, becoming a trusted, cited source is a new way to win. When users see your brand name repeatedly cited as the authority on a topic, they are more likely to seek you out directly.
Action: Build your site’s topical authority through high-quality, comprehensive content. In an era of fewer organic clicks for some queries, a strong brand that users recognize and trust is invaluable.
Monitor Your Traffic and Diversify Measuring the direct impact of AI Overviews can be challenging, as Google Search Console doesn’t yet isolate these interactions.
Action: Monitor your informational pages for significant drops in clicks and impressions. Given the potential for reduced organic Google traffic, it’s also more important than ever to build and nurture other channels, like email lists, social media communities, and referral traffic.
Programs And Tools
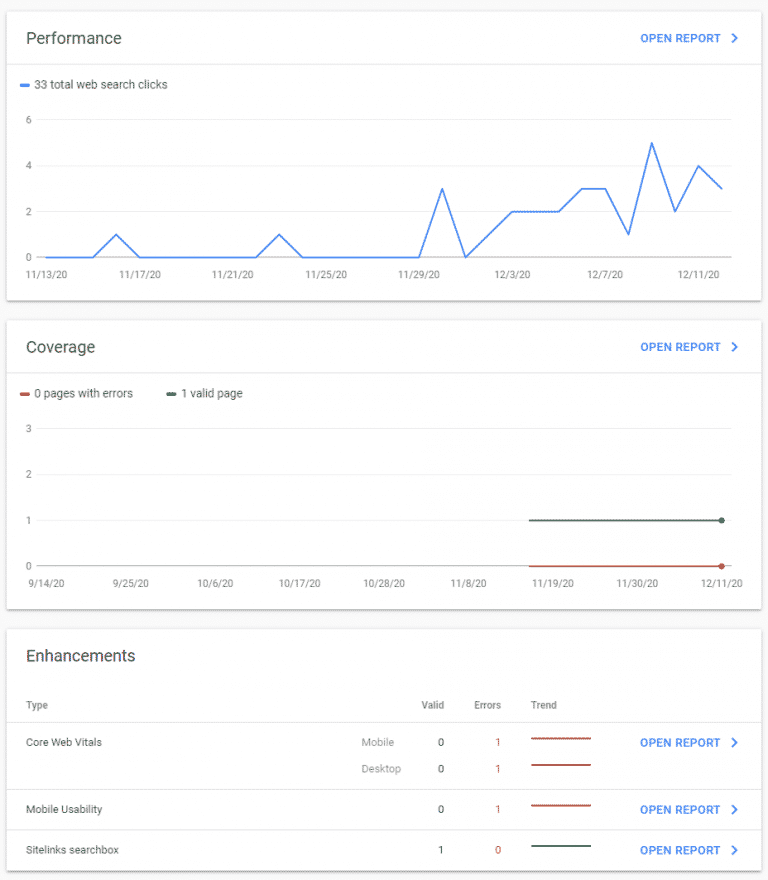
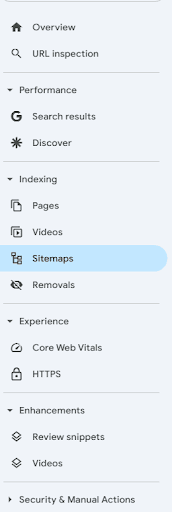
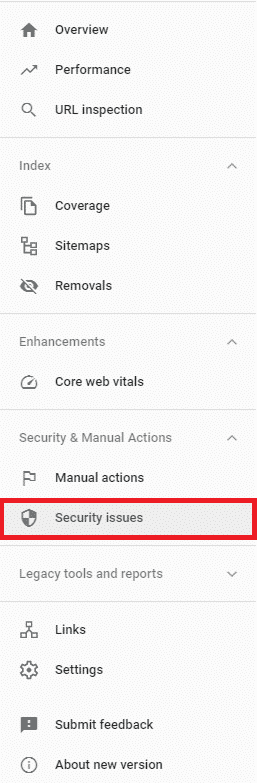
Google Search Console (GSC) is perhaps the most widely used technical SEO tool. In GSC, you can:
- See which pages are crawled and indexed
- Find out why pages are not being crawled and indexed
- Check Core Web Vitals
- See if Google has taken a manual action (blacklisted your site)
- Upload sitemaps
- Submit pages to be removed from Google’s index
- Inspect URLs
- And much more
GSC is used for technical SEO as well as both on-page and off-page SEO; it’s an incredibly powerful tool that everyone in SEO should take the time to get familiar with.

Screaming Frog is an incredibly powerful SEO tool that crawls your website and automatically identifies issues; it can also help you manually identify and fix problems. This is one of our favourite tools. Here are some of the many technical SEO tasks that Screaming Frog helps with:
- Evaluating your site’s architecture (shallow architecture is typically best)
- Finding orphaned pages
- Finding redirect chains and loops
- Spotting technical SEO issues like unsafe cross-origin links
- Finding 404s
- Finding duplicate content
- And so much more
Like GSC, Screaming Frog is useful for more than just the technical aspects of SEO. You can, for example, use it to spot page titles and headings that are duplicated across multiple pages. We highly recommend learning Screaming Frog to anyone who is interested in mastering SEO.
Lighthouse/PageSpeed Insights
Lighthouse and PageSpeed Insights both accomplish the same task: Measuring Core Web Vitals. In-house, Lighthouse tends to be our preferred tool because it can be downloaded as a Chrome app to measure CWV in one click.
Chrome DevTools
Right-click this page (the one you’re reading right now) and click “Inspect”. What comes up is Chrome DevTools—one of the most versatile tools in any technical SEO guru’s toolbox.
You can use DevTools to:
- Check how a page displays on a number of different devices and test mobile responsiveness
- Find errors and warnings that Google notices on your site
- Evaluate what elements of your page are taking the longest to load
- And so much more
Learning DevTools can be somewhat daunting—fortunately, the tools are completely free and can be used on any website by any Chrome user. We highly recommend using DevTools on a variety of different sites to start learning!
Ahrefs
Ahrefs is an all-in-one SEO tool, similar to other SEO tools like Semrush. We’re including Ahrefs in the list because it’s the all-in-one tool that we use—and we use it because it’s our favourite.
For technical SEO, Ahrefs has an incredible site audit tool; it’s a comprehensive technical SEO audit that finds all kinds of errors, from orphan pages to localization errors.
The functionality of the site audit is similar to some of the audits you can do with Screaming Frog, but because Ahrefs is an all-in-one tool, you can also use it for keyword research, competitor analysis, and other non-technical SEO tasks as well.
Your Website's Structure
Imagine you’re in a mall, looking for the food court. You check the map of the mall, and you see that in order to get to the food court, you’ve got to go through a Walmart, which is directly connected to a Best Buy, which is subsequently connected to a Bed, Bath, and Beyond. There is no other path to the food court – you must go through all three stores first.
I don’t know about you, but I’d about-face and leave that mall immediately.
That’s what a bad sitemap looks like. Your pages need to be organized in an efficient hierarchy.
Optimizing Website Structure
From your website’s homepage, it should take 3 clicks, at most, to reach any other page on your website.
“But wait!”, I hear you saying, “I have thousands of pages! How is that possible?”
It’s all in your site’s architecture, my friend.
Let’s look at this in two ways: mathematically and visually.
On the mathematical side of things, your homepage is “click 0”. Imagine you have 10 links going from your homepage – “click 1” gets you to 10 new pages. From each of those pages, you might have another 10 links – “click 2” gets you to 100 unique pages. From each of those pages, another 10 links, and suddenly your users can access 1000 pages in 3 clicks.
It’s that simple. Now imagine you have more links on any one of those pages – you can easily multiply the number of pages that are accessible within 3 clicks. This makes your website easier to navigate for both users and bots.
Now for the visual example. Compare this:
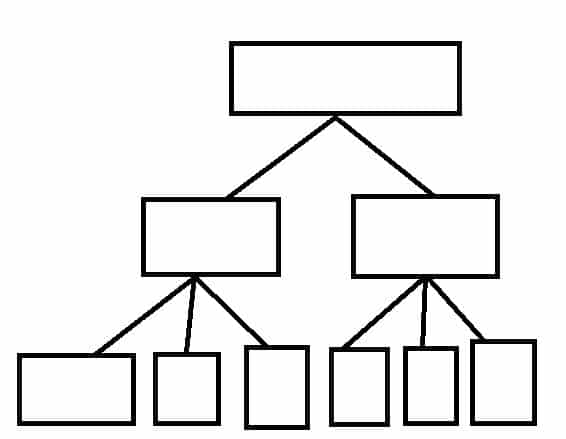
To This:
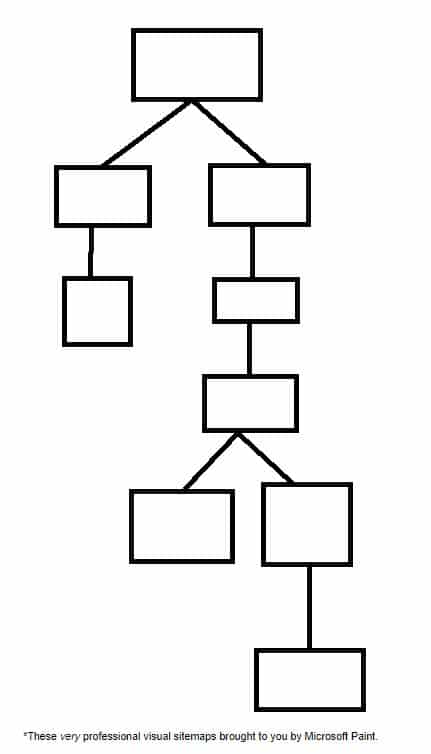
It’s pretty easy to see which one is going to be easier to navigate. Expand that to thousands of pages and you can see why it’s important to have a shallow, 3 clicks or less hierarchy.
Obviously, the examples that we’ve talked about here are highly idealized – it’s unlikely that every page will have exactly 10 links from it – but try to get your website as close to this ideal form as possible.
URL Structure
Your URLs should all describe the page they are associated with. The URL for this technical SEO guide is a perfect example; it tells you exactly what you’ll find on the page.
When a page with an underoptimized URL is receiving no traffic and no backlinks (links from websites that aren’t yours), you may be able to simply delete the page and move it to a new URL—just be sure to remove it from your sitemap, too. In other cases, you will need to redirect the page to the new URL.
Be cautious when redirecting a URL that is receiving a lot of traffic and links; doing so may actually hurt your SEO. Focus on changing URLs for pages that are underperforming.
Breadcrumb Navigation
Hansel and Gretel’s use of breadcrumbs was ill-fated – fortunately, there are no digital birds to devour the breadcrumbs you leave on your website.
Breadcrumb navigation allows users to find their way home by following the breadcrumbs. It’s often used by large e-commerce sites or sites with so much content that it’s nearly impossible to fit the idealized 3 click structure we’ve described. Breadcrumb navigation looks like this
Homepage > Page clicked from homepage > Page clicked from second page … > Page you’re on.
Here’s an example from Best Buy:

I can immediately tell what page I’m on (freezers), and how I got there, so it’s easy to go back if I don’t find what I’m looking for.
You should only implement breadcrumb navigation if it makes sense for your website. Most restaurants and retailers with only a few different products won’t benefit from this type of navigation – it’s best for navigating when there are dozens (or hundreds) of different category pages, each with different products.
Web Page Management
Now that you understand how your site should be structured, it’s time to look at the building blocks of that structure – your web pages.
Unique Content
Every page that you want indexed by search engines should be unique and useful to users. In the next section, we’ll talk about how to stop search engines from crawling and indexing pages that you don’t want them to. For now, let’s learn how to choose URLs, and how to handle pages that aren’t unique and/or useful.
Choosing URLs
We’ve already discussed how URLs should be structured – use those subfolders, people! When choosing URLs, keep it simple – the end of your URL should almost always be the page’s title.
Let’s look at the example from above: the title of mysite.com/toronto/seo/top-50-tips should almost certainly be “Top 50 SEO Tips”, “Top 50 SEO Tips for Toronto”, or some such similar thing.
This accomplishes two key objectives: it enhances user experience by maintaining consistency, and it simplifies troubleshooting errors, redirecting pages, and other technical SEO tasks.
Handling Duplicate Pages
Duplicate pages typically fall into three different categories:
- True duplicates (redundant pages)
- Variant pages
- Pseudo-duplicates
True duplicates are two pages that serve up exactly the same content. Duplicate content should never exist on your website, and all but one of the duplicate pages should be redirected or eliminated.
Variant pages are incredibly common. These include product variants (a blue and black dress on one page, and a white and gold dress on the other), and sequential pages, like the first, second, and third category pages for a blog. These variant pages are handled in two ways:
- Canonicalization, which tells Google which page to index, and which variant pages are associated with the canonical (indexed) page
Pagination, which automatically creates sequential pages once a threshold has been met (for example, 10 blogs per page on the URL yoursite.com/blog/)
Canonical Tag Best Practices
There are a few things to keep in mind when using canonical tags – some of these may seem obvious, but they help to illustrate the tag’s function.
First, you want to avoid mixed signals. When Page 1 says “Page 2 is canon” and Page 2 says “Page 1 is canon”, search engines won’t know which one is actually canon. Pick a page as your canonical page, and stick with it.
Second, you should know that you can self canonicalize pages – and you should. Content management systems (CMS) and dynamic websites often automatically add tags to content, and these tags can look to search engines like unique URLs. By self canonicalizing all of your pages, you’ll avoid this trap.
Finally, you may have duplicate http: and https: pages on your site. We’ll talk more about HTTPS and SSL in the “Page Experience” section, but for now you just need to know that it’s almost always preferable to canonicalize your HTTPS page over your HTTP page.
Redirects
There are times when canonicalization isn’t appropriate, but a particular page on your website is no longer unique and useful. Let’s say, for example, we’d published a comprehensive SEO guide in 2010. In 2020, we publish a new comprehensive SEO guide to account for all the changes SEO has gone through in 10 years.
We don’t necessarily want to get rid of our 2010 guide, as we might have a lot of external and internal links pointing to it; however, we don’t want to provide our users with outdated information.
That’s where a 301 redirect might come in handy.
A 301 redirect informs search engines that a specific URL has been permanently redirected to a different URL. Any users who visit the redirected URL will be redirected to the new URL instead.
301 redirects are widely used in SEO. Some common uses for 301 redirects include:
- Automatically redirecting http: traffic to the https: URL
- Redirecting traffic when restructuring your website (perfect for cases where you’re changing from subdomains to subfolders)
- Merging content that’s competing for the exact keywords
- Redirecting 404s (Page not found)
Though there may be some very technical corner cases where you don’t want to use 301 redirects, if you’re reading this guide, chances are you won’t encounter them. Opt for 301 redirects over other 3xx codes.
301 Best Practices
Just like with canonical tags, there are ways to keep your 301 redirects well-organized to simplify things for both you and search engines.
- Avoid redirect chains, i.e. Page 1 -> Page 2 -> Page 3. Instead, opt for Page 1 -> Page 3 and Page 2 -> Page 3.
- Avoid redirect loops, i.e. Page 1 -> Page 2 -> Page 1. This should almost never come up, but it’s valuable to check for nonetheless – it’s a user experience killer (too many redirects can prompt an error).
- Don’t add 301’d pages to your XML sitemap (more on that later)
- Replace other 3xx redirects with 301 redirects
- Fix any redirects to broken pages (404s, etc.)
- Redirect all http: to https:
Finding things like redirect chains can seem complicated, especially if you’ve got a large website. This is where tools like Screaming Frog can come in handy – they can automatically find bad redirects, 3xx status codes, loops, and other redirect issues. They’re wonderful diagnostic tools, as long as you know how to fix the problems when you find them – and now you do!
301 or Canonicalization?
There are times when two pages might be very similar, but not exactly the same – in these cases, you might wonder whether you should perform a 301 redirect or simply canonicalize a page.
As a rule of thumb, if you’re not sure which to use, opt for the 301. The cases we discussed in both sections are good examples of the use of each, so if those cases pop up for you, just refer to this guide!
Eliminate Useless Pages
There are, of course, cases where a page is actually useless. There’s no similar content, so a 301 isn’t appropriate – these pages should simply be eliminated (creating a 404).
Keep in mind that a page is not useless if it’s getting traffic – traffic is the whole point of SEO. If a page is getting a lot of traffic but you feel its content is outdated, create a new page with better content, and 301 the original page to the new content to keep that traffic.
There may be cases in which a page is useless to search engines, but still useful to your clients. These are the cases we’ll address in this next section:
Robots.txt
When search engines index a web page, it can show up in search results. There are plenty of pages you don’t want showing up on SERPs, from your own internal search engine results to staging pages. In this section, you’ll learn how to tell search engines what you want them to crawl.
In other words, you’ll learn how to control robots. That’s a pretty decent superpower.
Meta Robots and X-Robots
Robots.txt works on the directory or site level – meta robots, on the other hand, instruct robots on how to behave on the page level.
The meta robots tag should be placed in the <head>. The format is:
<meta name=“ ”, content=“ ”>
In the meta name, you can put robots (to inform all bots how they should behave), or a specific bot (like Googlebot).
While there are a variety of things you can do with meta robots, for this introductory guide we’ll focus on content=“noindex” and content= “nofollow”, conveniently known, respectively, as noindex and nofollow.
Noindex is useful in a ton of scenarios – according to Google, any web page you don’t want indexed should be tagged with noindex. That’s because Google can index pages without crawling them if they’re pointed to by links.
Internal search results are great pages for noindex. You don’t want to include them in your robots.txt, because you want Googlebot and other search engine crawlers to follow all of the links on your search page – it’s a great way for them to get a more complete inventory of your website. On the flipside, if I’m using a search engine, the last thing I want in the results is a link to more search engine results.
The nofollow tag tells bots not to follow any links on a given page. This tag is rarely used on the page level, because you can instead choose to nofollow specific links by following this format when linking:
<a href=”https://websiteurl.com” title=”Website URL” rel=”nofollow”>.
There are a ton of things you might want to nofollow, but you should know that two of the most common nofollow cases, sponsored links and user comments, have specific code: for sponsored links, you should use rel=“sponsored”, while for user generated content, you should use rel=“ugc”.
X-Robots can do all of the things meta robots can do and more – you can, for example, use X-Robots to block bots from crawling and indexing any pdf on your site. While using X-Robots for this type of work falls outside the scope of this beginner’s guide, you can check out Google’s guide to X-Robots-Tag.
One last note before we get off the topic of robots – some of you might have been using the noindex tag in your robots.txt file. Google no longer recognizes noindex in robots.txt, so you’ll have to manually noindex those pages.
You should also avoid including pages you don’t want indexed in your robots.txt. That might seem counterintuitive, but if a page can’t be crawled, search engines can’t see the noindex tag, and so they may index the page from links.
XML Sitemap
An XML sitemap is a roadmap of all the important pages on your site that you want Google and other search engines to crawl and index. Think of it as providing a direct, clear list of your valuable content. Submitting this roadmap via Google Search Console is a fundamental SEO best practice.
Creating Your Sitemap in 2025
While you can still create a sitemap manually, this process is largely automated today. For most modern websites, the sitemap is dynamically generated and updated by the content management system (CMS).
The Best Method (Automatic): Platforms like WordPress (using plugins such as Yoast or Rank Math), Shopify, and Squarespace automatically create and update your sitemap. Whenever you add or remove a page, the sitemap is refreshed. This is the gold standard.
Manual & Crawl-Based Tools: If your site is custom-built or you need more granular control, desktop crawlers are perfect. You can use the free version of Screaming Frog for sites up to 500 pages. For a quick, no-install option on a small website, XML-Sitemaps.com is also a great choice.
Quality Over Quantity
You might hear that small sites or those with good internal linking don’t need a sitemap. Ignore this advice. It’s incredibly easy to implement a sitemap, and it’s a powerful way to guide crawlers.
The key is to ensure your sitemap is clean. Search engine crawlers don’t have infinite resources; you want them to spend their time on your valuable pages. Your sitemap should only list your final, canonical URLs.
It’s critical to exclude pages that don’t offer value or shouldn’t be indexed, such as:
Pages marked “noindex”
Redirected (301) or broken (404) URLs
Non-canonical pages
Internal search results or filtered navigation pages
By providing a clean, focused list, you help Google find and index the content you actually want it to see, which is more critical than ever in today’s competitive landscape.
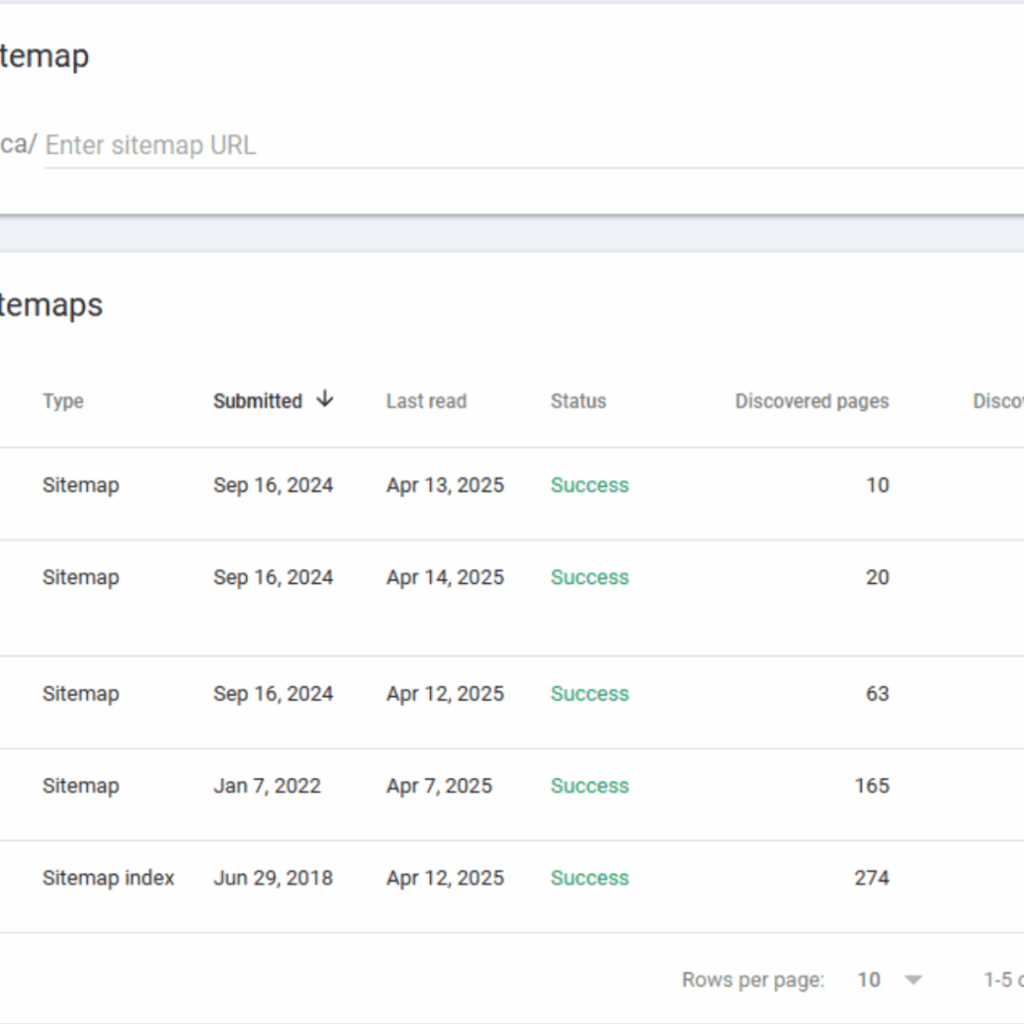
Often, a site will have multiple sitemaps, both because there is a limit to the number of pages that can exist on a single sitemap and because breaking sitemaps into categories can make pages easier for Googlebot to crawl, index, and categorize.
Javascript and Indexing
In 2025, effectively managing JavaScript will be a core technical SEO skill. Most modern sites use JS frameworks like React or Vue, which present a unique challenge for search engines due to Google’s “two-wave” indexing process.
First, Googlebot crawls the initial HTML. For a client-side rendered app, this is often a nearly empty shell. Then, much later, the page is put into a second queue for rendering, where Google executes the JavaScript to see the final content. This delay is not just a simple wait; it has direct consequences. Rendering consumes significant crawl budget, meaning for larger sites, Google may process fewer pages. Furthermore, if your scripts are slow or complex, Google may time out before rendering completes, indexing an incomplete or blank page.
For Single-Page Applications (SPAs), the challenges are more specific. Internal links must be implemented with standard <a href="/path"> tags, not just JavaScript functions, or Googlebot cannot follow them. Additionally, metadata like <title> tags and meta descriptions must be dynamically updated for each “page” or view to avoid duplicate content issues.
To ensure fast and reliable indexing, you must serve a fully-rendered HTML page to Googlebot. There are three primary strategies:
Static Site Generation (SSG): Best for sites with content that doesn’t change often (blogs, marketing sites). The entire site is pre-built into static HTML files that load instantly. This is the most efficient and SEO-friendly method.
Server-Side Rendering (SSR): Ideal for dynamic sites (e-commerce, news). The server generates a full HTML page for each request, ensuring bots and users get fresh, complete content.
Dynamic Rendering: A workaround where the server sends pre-rendered HTML to bots but the standard client-side app to users. This should be considered a temporary fix while implementing a full SSR or SSG solution.
Do not rely on the <noscript> tag as a primary SEO tactic; Google largely ignores it for indexing.
Finally, never assume your implementation works. Use the URL Inspection Tool in Google Search Console to see precisely how Googlebot renders your page. This allows you to verify that your content and links are visible, confirming that your rendering strategy is successful.
Structured Data & Rich Results
Schema tells Google what a page is about and what the different elements on that page do. Using the right schema can make a page eligible for Rich Results; these are detailed search results that tend to rank higher in the search engine results pages and generate better clickthrough rates (CTR).
Structured data can tell Google that you’re a local business, that your website uses breadcrumb navigation, that a page is dedicated to product reviews, and so much more. Tools like RankMath can help you set up schema automatically, but if you want to get granular about schema for each page, it’s worth learning how to insert schema manually.
Why It’s Critical:
Unlocks Rich Results: Enables star ratings, prices, and FAQs directly in search results, which increases click-through rates.
Powers Modern Search: Feeds your information to Google’s Knowledge Panel and AI-driven results
Implementation:
Use JSON-LD: This is Google’s recommended format. Add it as a code snippet to your page’s HTML.
Deploy Key Schema: Start with schema types relevant to your content:
Organization: Your business logo, name, and contact info.LocalBusiness: Your address, hours, and phone for local SEO.Product: For e-commerce; shows price, availability, and reviews.Article: For blogs and news to get into “Top Stories” carousels.FAQPage: To display Q&As directly in the search results.
Implementing structured data is a direct way to improve how Google understands and displays your site.
Page Experience
The last thing we want to talk about is a set of signals Google calls “page experience”. Page experience signals are super relevant to your users, because they describe things like how quickly a page loads and how well it performs on mobile. While optimizing your page experience is out of the scope of this primer, I’ll take you through:
- What the signals are
- How you can check your performance
- Basics things to keep in mind for optimization
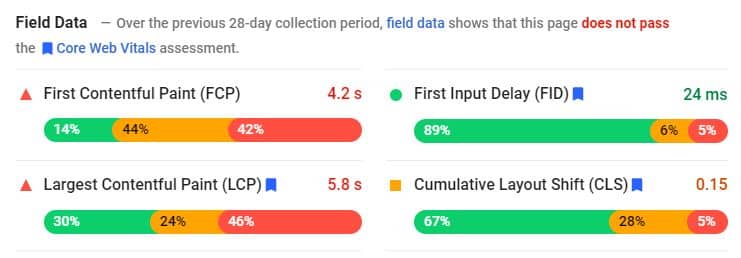
Core Web Vitals
Core Web Vitals (CWV) are the hot new commodity in the SEO world – Google is so excited about adding CWV to their ranking algorithm that they’re giving all of us several months notice before it goes live. May 2021 is the due date, so get your site ready!
CWV is made up of three different factors:
- Largest contentful paint (LCP), which evaluates loading speed
- Interaction to Next Paint (INP) which evaluates interactivity
- Cumulative layout shift (CLS), which evaluates visual stability
LCP
LCP is used to determine how quickly the main content of your page loads. There’s a lot you can do to reduce LCP loading times, from minifying your CSS and Javascript (Google has suggestions for minification tools) to using Content Delivery Networks.
The best way to optimize LCP, though? Reduce the amount of data that needs to be loaded. This can be done by compressing or simply removing content. Google has a bunch more tips to optimize LCP.
INP
While LCP determines when your page’s main content becomes visible, Interaction to Next Paint (INP) now defines the overall responsiveness of your page to user interactions. Moving beyond just the first input, INP assesses the entire lifecycle of an interaction from a click, tap, or keypress to the subsequent visual update on the screen. A low INP score is crucial for a positive user experience and a key signal for search engine rankings in 2025.
Delays in responsiveness are often attributed to the cumbersome execution of JavaScript. To significantly improve your INP, it is essential to optimize the parsing, compilation, and execution of JavaScript. Techniques such as breaking up long tasks, deferring non-critical JavaScript, and minimizing main-thread work are paramount. Employing lazy-loading for both JavaScript and media assets not only enhances INP but can also contribute to a better LCP. Ultimately, streamlined JavaScript management is fundamental to mastering both LCP and the new standard of interaction readiness, INP, ensuring a fluid and engaging experience for your users.
CLS
CLS describes how much the content on a website shifts as users scroll through it. Shifts can be caused by a number of things, from improperly formatted images to dynamic advertisements.
As you can imagine, Google has a comprehensive guide to CLS optimization, too. One key point from that guide is to opt, where possible, to have ads slots in the middle of the page instead of on top, as this tends to reduce how much content gets moved around if a dynamic ad is larger than anticipated.
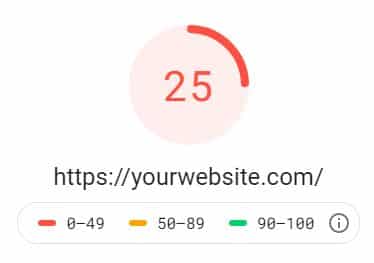
GSC and PageSpeed Insights
Google really wants you to pay attention to your Core Web Vitals, as you might have guessed from the number of optimization guides they’ve provided and the name of the metric. As such, you can get insights about how a page is performing both through your Google Search Console and through Google’s PageSpeed Insights. I highly recommend using them regularly.
The Importance Of Mobile Friendliness
Most web traffic (63.31% as of March 2025) comes from mobile devices. When your site is not responsive or does not load quickly on mobile devices, you will have a very hard time ranking.
Google uses mobile-first indexing; this means the first version of a site that gets indexed is usually the version that’s displayed on mobile devices. This doesn’t mean you shouldn’t optimize for desktop—but it does mean that optimizing for mobile devices must be a priority.
Keep loading speeds down, avoid layout shifts, reduce the size of forms, and make ease of navigation on mobile devices a priority.
A truly mobile-friendly site goes far beyond just being “responsive.” While a responsive design that adapts to all screen sizes is the baseline, Google’s ranking signals are far more sophisticated, revolving around the Page Experience. This includes:
Core Web Vitals (CWV): These are critical metrics measuring real-world user experience. A fast Largest Contentful Paint (LCP), a responsive Interaction to Next Paint (INP), and a stable Cumulative Layout Shift (CLS) are direct ranking factors. Slow loading times and clunky interfaces on mobile will actively harm your search performance.
Designing for the Mobile User: The user journey must be seamless and intuitive. This means streamlined navigation, easily tappable buttons, and simple forms. Every element must be optimized for a fast, intuitive mobile interaction.
Avoiding Intrusive Interstitials: The era of aggressive pop-up ads is a thing of the past. Google penalizes pages that display intrusive interstitials, which obscure content. Any pop-up, such as for a newsletter sign-up, must be easy to dismiss and not prevent the user from accessing the main content. Legally required interstitials, like those for cookie consent or age verification, are generally acceptable.
In short, thinking “mobile-first” is no longer a forward-thinking strategy; it’s the bare minimum for survival and success in the current SEO landscape.

E-E-A-T: Experience, Expertise, Authoritativeness, Trustworthiness
E-E-A-T is not a direct ranking factor in itself, but rather a set of principles Google’s human quality raters use to assess content. The signals that align with these principles are what influence rankings and determine if your content is trustworthy enough to be featured in an AI Overview. Ignoring E-E-A-T means ignoring the very definition of quality in Google’s eyes.
Experience
This is the “E” added in recent years, emphasizing the importance of first-hand, real-world knowledge. Google wants to see that the content creator has actually done what they are writing about.
How to Demonstrate It:
Original Media: Use your own original photos and videos showing the product in use, the process being explained, or the location being reviewed. Avoid using only stock imagery.
First-Hand Anecdotes: Share personal stories, case studies, and specific details that could only be known by someone with direct experience.
User-Generated Content: Leverage authentic customer reviews and testimonials that share their own experiences with your product or service.
Expertise
This refers to having a high level of skill or knowledge in a particular field. For sensitive “Your Money or Your Life” (YMYL) topics like medical, legal, or financial advice, this must be formal, credentialed expertise. For other topics, it can be demonstrated through depth of knowledge.
How to Demonstrate It:
Author Bios: Create detailed author pages and bylines for your content creators. List their credentials, education, years of experience, and links to other publications or their professional social media profiles (like LinkedIn).
In-Depth Content: Dive deeper into comprehensive explanations. Cover topics comprehensively, answer related questions, and explain complex concepts clearly.
Cite Sources: Link out to reputable, authoritative sources like academic studies, industry reports, and government websites to support your claims.
Authoritativeness
Authority is about your reputation, especially among other experts and influencers in your industry. When other recognized authorities see you as a go-to source of information, your authority grows.
How to Demonstrate It:
Quality Backlinks: Earn backlinks from respected, relevant websites in your niche. These act as votes of confidence from other authorities.
Mentions and Citations: Look for mentions of your brand, authors, or studies on other reputable sites, even if they are not linked.
Off-Site Presence: Showcase your authority beyond your own website. This includes speaking at industry conferences, appearing on podcasts, and contributing to well-known publications.
Trustworthiness
Trust is the most crucial component of E-E-A-T. An untrustworthy site has low E-E-A-T, regardless of how experienced or expert it may seem. Trust is about accuracy, transparency, and security.
How to Demonstrate It:
Site Security: Your site must use HTTPS. This is non-negotiable.
Transparency: Ensure a clear and easily accessible “About Us” page, complete contact information (including a physical address if applicable), and transparent privacy policies and terms of service.
Accuracy: Ensure your content is factually correct and kept up to date. If you make an error, correct it transparently. For news content, distinguish clearly between reporting and opinion.
Manage Reputation: Monitor and professionally respond to reviews on platforms like Google Business Profile, Trustpilot, and others. A positive online reputation is a powerful trust signal.
By systematically building and showcasing your Experience, Expertise, Authoritativeness, and Trustworthiness, you are aligning your website with the core principles of Google’s quality systems. This not only improves your potential to rank in traditional search but is essential for establishing the credibility required to be a cited source in the new era of AI Overviews.
Website Security
Update Top-Level Website Security
Every web page on the modern internet should use Transport Layer Security (TLS) to protect users’ information. Pages that have an TLS certificate use HTTPS (instead of HTTP). HTTPS is a massive ranking factor for Google. You can get a free TLS certificate for your website by using Let’s Encrypt.
To be eligible for HTTPS, you need to get a SSL certificate. Fortunately, there are a lot of people who want the web to be safe to browse, so you can get an SSL certificate for free. Let’s Encrypt is a great place to start. You may already have certification and HTTPS – WordPress, for example, automatically provides HTTPS and redirects HTTP traffic to HTTPS.
Technical K.O
And with that, you can knock more technical SEO requirements off your list than 99% of website owners. While GSC and the other tools we’ve presented here can definitely help you find and fix technical problems, I can understand if this whole article was a bit complex.
Fortunately, if you think pouring all of this energy into technical SEO is going to be a bit too much effort, we can help. We’ve developed a free SEO audit tool – we’ll give you insights about how your site is performing from a technical perspective, free of charge. If you’re finding this all to much for you to handle, don’t worry at First Rank we have a team dedicated to this stuff, explore our Canadian SEO Services.
Get Your Free SEO Audit
When it comes to technical SEO, everything we’ve discussed in this guide is just the tip of the iceberg. Issues arise constantly, and there are issues that you can miss even if you use the technical SEO tools we listed here.
At First Rank, we want all of our clients to understand exactly what can be improved on their sites and how we can help. That’s why we offer a free technical SEO audit that we developed in-house. This audit will tell you exactly what technical optimizations your site might need.
The audit is completely free, and there’s no obligation to sign up for our SEO services; we also offer a free consultation along with the audit. Ready to improve your site speed, security, user experience, and more? Get a free technical SEO audit from First Rank today!